Salesforce CMS is a one-stop-shop for managing your multi-channel content, straight from Salesforce. Here’s how to set it up, with a view to using the new Pardot Email Builder for Lightning Experience. Continue reading “Pardot Email Builder in Lightning Experience: Setup Salesforce CMS”
Category: Pardot
Setup the Pardot Email Builder in Lightning Experience
One of the most anticipated releases in Pardot history – the Pardot Email Builder in Lightning Experience – was released this month. This new email experience uses the power of lightning to give users the seamless experience of a drag and drop email editor. Here at Nebula, we wanted to share the set up of this shiny new feature, and provide some tips along the way. Continue reading “Setup the Pardot Email Builder in Lightning Experience”
Pardot Email Logging in Salesforce
We all dream of an ideal world, where sales and marketing come hand in hand in Salesforce. But the biggest challenge for sales teams is often the inability to track directly sent emails as part of their measured activities. Well, I’m here to tell you it is possible, if you enable the Email Logging functionality via the connector.
Reduce, Reuse, Recycle with Snippets!
One thing you can never have enough of is time, and one way to save yourself some is by using re-usable ‘Snippets’ in your Pardot email marketing. Here’s how you can use them, and save yourself time by creating re-usable content, which you can recycle for later use! Continue reading “Reduce, Reuse, Recycle with Snippets!”
Creating Pardot Forms That Convert Prospects
Forms are the number one lead acquisition tool in Pardot. We rely on them to gather information about prospects, with the hope of closing sales. Despite their importance, they often get neglected, leading to low conversion and submission rates. So how can we create Pardot Forms that increase conversion and submission rates?
Continue reading “Creating Pardot Forms That Convert Prospects”
Multiple Webinars – One Form
With the world still very much in the throws of Covid-19, it is as important as ever to manage your events online. For businesses who used to do a lot of events in person, the switch to online events can be daunting. It can also often lead to a lot of Pardot Forms. But what if you could run multiple webinars through one form? We’ve been working hard at Nebula to find a solution to streamline your processes…here it is!
Overview
Businesses have the increasing need to be able to run multiple webinars, and allow prospects to register for each of those webinars. It can be time consuming for marketing teams to have to set up a new form and landing page each time a new webinar is required.
This solution allows customers to run multiple webinars off one form, using checkboxes, thus allowing prospects to register for multiple webinars at once.
This is an advanced topic and if you do not have experience working with javascript, get in touch with us to discuss the solution.
Assets
The following Pardot assets need work done to them for this solution to work:
- Layout Template
- Form Handlers
- Form Fields
- Above Form Copy
- Form Thank You Code
Let’s take a look at what needs doing:
Layout Template
As this methodology uses javascript, we’ll need two pieces of script to sit in our layout template.
You’ll need to remember that if your form is sitting on a Pardot landing page, the two scripts must be placed in the layout template of that landing page.
Form Handlers
One form handler should be set up per webinar:
- The only field that needs to be present on the form handler is ‘Email’.
- Add any completion actions to the form handler. For example:
- Register for webinar
- Add to list
- Add to CRM Campaign
Form Fields
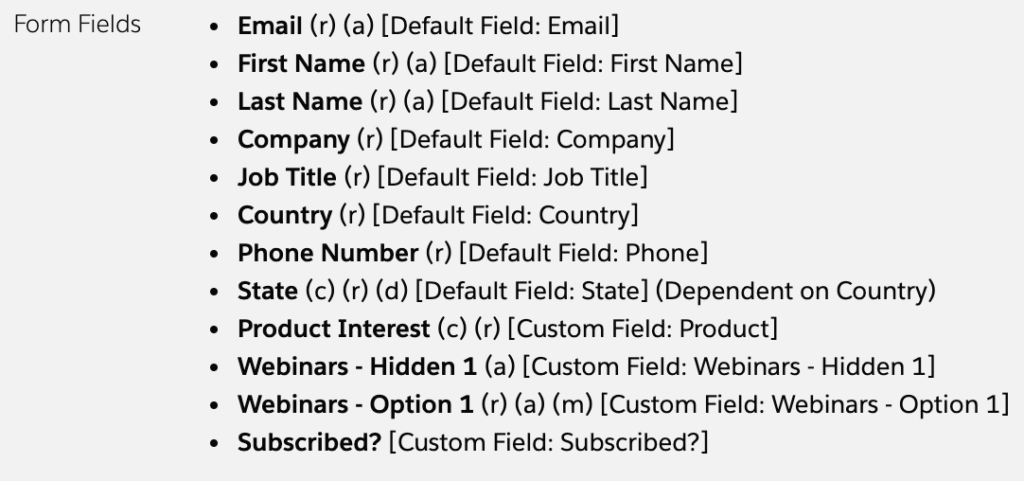
Two prospect custom fields must be created and present on the form.
- One is a hidden field called ‘Webinars – Hidden 1’, and this should be a text field.
- One is the webinar field. You can call this whatever you want, but something like ‘Webinars – Option 1’ would be suitable – this should be a checkbox field.
- If you want to group webinars into categories, you’ll need to have duplicates of both the checkbox field and the hidden field per group.
Above Form Copy
Under the look and feel ‘above form’ code section, a script needs to be placed. This script will reference the script we placed in the layout template, and will look at our newly created fields.
If you are using multiple webinar fields, a new line will need to be added here to reference these additional fields.
Form Thank You Code
The last piece of code will go under the Completion Actions section of your form. This script is in place to post the form submission results to the relevant form handlers.
What fields does this work with?
You can use this solution with both checkbox and drop down fields.
Remember, if you use a drop down field, prospects will only be able to select one webinar to register to from each drop down field present on the form.
If you use a checkbox field, prospects can register for as many webinars as they want.
The brilliant part of this solution is that once you have set it up the first time, duplicating and re-using assets is really straightforward.
If this sounds like a solution that could work for you and your business, get in touch and we can help you set it up.
Pardot Forms Kiosk / Data Entry Mode is The Hero You Need
Sure, hero might be dramatic, but it’s true. Pardot Forms Kiosk / Data Entry Mode helps keeping Pardot prospect data accurate, and stops us spending hours trying to fix data issues. We’re going to take a look at how this feature works, when you should use it, and what problems you could face if you don’t.
Continue reading “Pardot Forms Kiosk / Data Entry Mode is The Hero You Need”
Should you Enable Pardot AMPSEA?
AMPSEA. No, my cat didn’t just walk over my keyboard. AMPSEA stands for ‘Allowing Multiple Prospects with the Same Email Address’, and it’s a feature that means Pardot Prospect records no longer need a unique email address. As you can imagine, this can be both a blessing and a curse, depending on what you want to achieve. I’m going to break down how AMPSEA works, and help you decide if it’s right for your Pardot account.
5+1 Steps for Sending Successful Emails
Working as an email marketer can be challenging these days, and you might find yourself frequently pondering the same questions. How can we increase the engagement of our prospects? What is the secret of sending successful emails? I find that these questions can be answered the best with the 5W’s of Communication model.
Pardot Lightning Email Builder: The Story so Far
Recently, Salesforce ran a webinar demonstrating the new drag and drop Pardot Lightning Email Builder. This feature has been a long time coming for the Pardot community, so I was excited to see what it had to offer. I’m going to break down the best features I saw, and explain what else this tool needs to offer to make it viable for Pardot users around the world. So here it is – the story so far!
Continue reading “Pardot Lightning Email Builder: The Story so Far”
The Beginners Guide to Pardot Layout Templates
Thinking about using Pardot Landing Pages or Forms? You’ve come to the right place. Before you can build your first Landing Page in Pardot, you’ll need to have your Layout Template ready. But what if you are not sure where to start? Then go ahead and read on!
Continue reading “The Beginners Guide to Pardot Layout Templates”
3 Use Cases for Custom User Roles
Pardot user roles determine which features and data a user has access to. While there are four default user roles to choose from (Administrator, Marketing, Sales Manager, and Sales), these roles are not editable. You may find there are instances where you need a more flexible solution for access permissions. Enter Custom User Roles.