One of the most anticipated releases in Pardot history – the Pardot Email Builder in Lightning Experience – was released this month. This new email experience uses the power of lightning to give users the seamless experience of a drag and drop email editor. Here at Nebula, we wanted to share the set up of this shiny new feature, and provide some tips along the way.
Requirements
Firstly, before you think about hosting a meeting to set up the Pardot Email Builder in Lightning Experience, make sure you have the following prerequisites:
To set up in Pardot
To set up in Salesforce
If you have all of these enabled, then you can begin the setup process detailed below.
If you don’t have any, or only some enabled, then please get in touch. We can help you take the first steps towards using the Pardot Email Builder in Lightning Experience!
Setting up the Email Builder in Lightning Experience
Part 1. Enable Folders and Enhanced Sharing
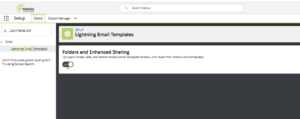
- Go to Salesforce Setup and use the search in the Quick Find box to go to ‘Lightning Email Templates‘.
- Switch on ‘Enable folders and enhanced sharing’.
Part 2. Email Setup
- Go to Salesforce Setup or Marketing Setup and use the search in the Quick Find box to go to ‘Email Setup‘. This is where you are able to manage the email settings for the new email builder in lightning experience. You are able to:
- Check the prerequisites are enabled
- Configure the Salesforce CMS channel to use when creating email content
- Create and manage the assignment of the ‘Use CMS with Email Templates and Email Content’ permission set
Note! As of the Winter ’22 release, this step is now available under the name ‘Content Setup’ as it also includes the Landing Page Builder configuration.
2.a. Prerequisites
- Check the prerequisites are enabled, if either of these is not enabled, select ‘Find Out How’ to learn more about the features and considerations for switching them on before coming back to the email setup. For help with this, please get in touch to speak to a Pardot expert.
2.b. File Hosting
Before proceeding with the File Hosting section of the email setup, ensure Salesforce CMS is visible to Users that will be creating Email Content. In the relevant User profile:
- Within Assigned Apps > Set Salesforce CMS to Visible (this enables the Salesforce CMS app for users).
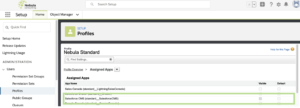
- In Object Settings > Set the tabs to Default On in the Tab Settings section for CMS Home, CMS Channels, CMS Workspaces, and CMS Experiences.
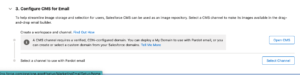
Once the right members of your team have access to Salesforce CMS, you can go ahead and configure the File Hosting for Email Content.
Learn how to setup Salesforce CMS here.
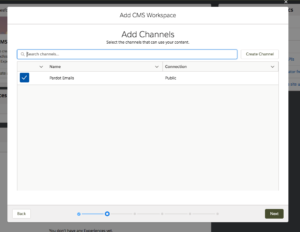
- Click Open CMS to go into Salesforce CMS to create a workspace and channel for organising your Email Content.
- Add a Workspace, e.g. Pardot Emails.
- Put it in a Channel, if you don’t already have one then you can create on here (ensure it’s a public channel!).
- Add Contributors, and select the Contributor Roles for each User.
- Admins can add/remove Users
- Content Managers have access to everything
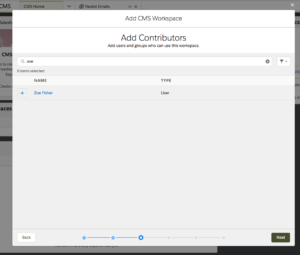
- Choose default language.
- Click Done.
- Back in the Email Setup, select your Channel to use for File Hosting.
2.c. User Access
Here you can manage which Users have access to Email Templates and Email Content:

- Click Create Permission Set – Salesforce will create the permission set Use Lightning Content Builder with CMS behind the scenes.
- Assign the permission set to the right Users by clicking Manage Assignments.

Once you have taken all of the steps in Part 2, go to Pardot in Lightning and make sure you can see Email Templates and Email Content in the navigation items. If you can’t see those items, try logging out of Salesforce and back in again.
Using the Email Builder in Lightning Experience
So now that you have successfully setup Pardot Email Builder in Lightning Experience, you are ready to start using the much-anticipated drag and drop email builder, and, most importantly, start sending out email content to your prospects with a simple yet powerful method!
For any support in gearing your business up for using this new feature, please get in touch.