For certain marketing campaigns you need to find a way to send personalised download files to your Pardot prospects. These situations could be the sending of a certification document or targeted information to your key accounts.
Let’s see what you would need to set up this process.
1. Upload your files to Pardot / host service
First, make sure you have all the individual files ready for your prospects. Then, you would need to upload them to a hosting service, which can be your Pardot, Dropbox or Box account.
2. Prepare your import spreadsheet with personalised download links
Create a new spreadsheet and include the email address, file link and file download value for each prospect.
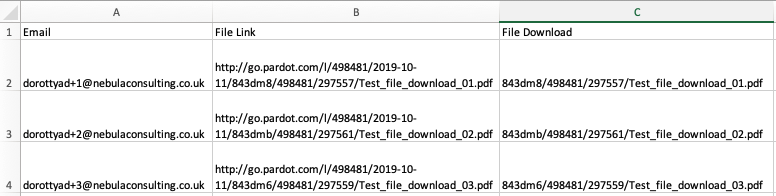
No matter where you have uploaded your files to, they should have the same structure and beginning. In case of Pardot, all file links start with the following:
[Your Tracker Domain]/l/[Your account id]/[Date of upload]
If you have uploaded all the files on the same day, you can separate the personalised download links by cutting down the first half. Include the specific element of that link into a new column (‘File Download’).
3. Prepare the Pardot field for the File Download
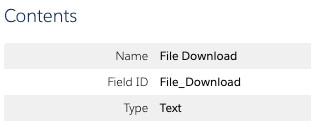 You would need to map that information to a prospect field in Pardot. If you already have a field that you can use, that is great! If not, then create one quickly as a text field.
4. Import your spreadsheet to Pardot
Take your prepared spreadsheet and import it to Pardot. During the second import step, make sure that you map both the Email and the File Download columns to your Pardot fields. If you have used a previously existing field, don’t forget to tick the overwrite data checkbox. 
Complete the rest of the import based on your default processes.
5. Prepare your email
Open the list email / email template where you would like to place the personalised download link. Go to the location of the link or CTA button, and amend the link in the source tab. You would need to puzzle the link from two locations:
- The url of the link that is common in all links
- The merge field or variable tag of that field – depending on which one you’re using.

The reason we recommend creating the link in two parts is so that both links are displayed in your email reporting. If you were to only include a variable tag, you wouldn’t be able to see the link clicks on this field at all.
By applying this process to your marketing campaigns, you are one step closer to providing a fully personalised experience for your prospects.
In case you would like us to support you in this process or advise on the best practices, get in touch today.