In the world of customer engagement, having a personalised and branded space for your community is essential. Salesforce Digital Experiences provide a powerful platform for collaboration and interaction, and one way to enhance your Digital Experience is by setting up a custom domain to make this personal to your brand.
Step 1: Purchase a Custom Domain
If you are a partner/consultant running this process on behalf of a customer then this step is specific to the customer only.
Begin by obtaining a custom domain from a domain registrar of your choice. This custom domain will serve as the web address for your Salesforce site, such as help.yourcompany.com.
Step 2: Retrieve the CNAME details from Salesforce
- Navigate to Setup in your Salesforce Org
- Search for Domains
- Select Domains under the Sites and Domains dropdown in User Interface
- Select “Add a Domain”
- Retrieve the CNAME from the Top Section
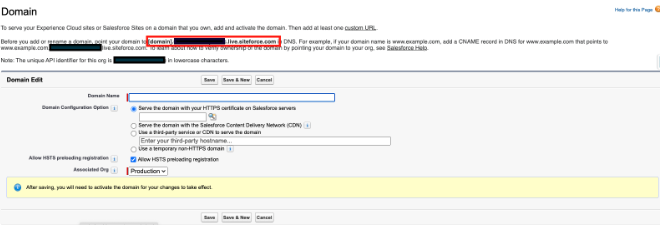
Decide on how you will serve the domain with one of the following options:
- Own HTTPS Certificate – With this option, Salesforce hosts your domain using your HTTPS certificate. If the DNS record for your domain points to an external service, you can’t use this option. Common examples of an external service include a web application firewall (WAF), a third-party host, or a third-party content delivery network (CDN). To set up a domain that points to an external service, see Use a Third-Party Service or CDN to Serve Your Custom Domain.
- Salesforce Content Delivery Network – Improves the performance and scale of your SF Digital Experiences, NOTE – This option cannot be used to serve a Salesforce Site
- Use a third-party service or CDN to serve the domain – Use this option if a third-party service or CDN serves your domain. Enter the external hostname that resolves to your proxy, web application firewall (WAF), or CDN service that handles the domain. Before you enable this option, work with your third-party service to use your target hostname, mydomain.my.salesforce.com, and to complete the other prerequisites.
If using the preferred option for Digital Experiences, the Salesforce CDN, then make a copy of the additional CNAME Requirements

Step 3: Configure DNS Settings
If you are a partner/consultant running this process on behalf of a customer then this step is specific to the customer.
- Log in to your domain registrar’s website.
- Access the DNS management section.
- Create a CNAME (Canonical Name) record that points your custom domain to your Salesforce provided CNAMES
Step 4: Set Up Custom Domain in Salesforce
- Navigate to Setup in your Salesforce Org
- Search for Domains
- Select Domains under the Sites and Domains dropdown in User Interface
- Select Add a New Domain
Domain Name – Should be the URL you would like this to cover
Domain Configuration Option – Select the option you have chosen at step 2
Allow HSTS preloading registration – Only select if you have registered the address at hstspreload.org
Associated Org – Production if this is for a Production instance
Step 5: Activating the Domain
If using the Salesforce CDN for provisioning as suggested for Digital Experiences, it can take between 4 and 14 hours for this provisioning to be complete. You will receive an email notification and the Domain status will become Awaiting Activation.
Once provisioning is complete, click the activate button on the related domain to activate.
Only move on to the next step once the Status of the Domain is “Completed”
Step 6: Create your Custom URL
- In Salesforce Setup, enter “Custom URLS” in the Quick Find box.
- Select Custom URLS under the Sites and Domains
- Click New Custom URL
- Select the Domain from the Domain we created above
- Select the Site inside Salesforce you would like to relate to this domain
- Enter the path if the URL direct should contain the path
Step 7: Testing
Open a web browser and navigate to your custom domain to ensure it correctly displays your Salesforce community.
Congratulations! You’ve successfully set up a custom domain for your Salesforce community, providing a branded and seamless experience for your users.