What is E2E testing?
End-to-end testing is a software testing methodology usually adopted at the final phase of the software development life cycle. Its purpose is to check entire journeys are working as expected from a user’s perspective.
By simulating user interactions with the UI, you can create consistent automated tests which focus on specific journeys in your system. An example journey could be a checkout process for purchasing items. This would simulate user interactions, from adding an item to the basket and checking out to inputting card details. These interactions can all be automated via code and periodically run against a target environment.
The benefits of these tests can help identify issues in the system where unit and integration testing are not able to help. It’s important to understand that end-to-end testing does not replace unit or integration testing, however, they are a valuable addition.
What is UTAM?
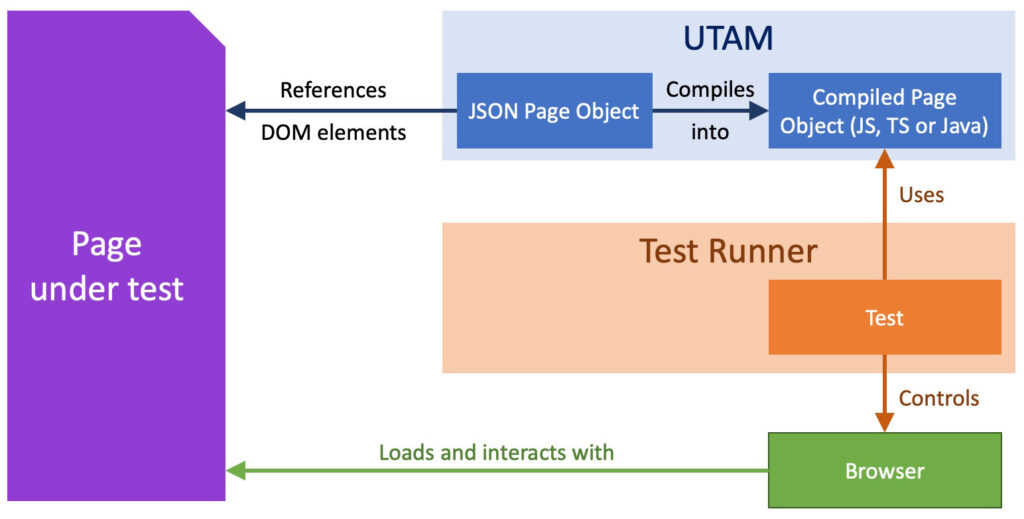
UTAM is a UI testing framework which assists with end-to-end testing. It’s based on POM (Page Object Model) which helps to decouple the test from the target webpage. UTAM ships with its own page object grammar authored in JSON, this ultimately makes it easier to read, write and maintain.

With 3 major releases each year, Salesforce is prone to changes with some critical components being updated silently. This poses a problem for E2E test automation because the tests may require updating to reflect the changes that Salesforce made even if your code under test has not changed. Since UTAM is developed by Salesforce and they are closer to the teams that provide these updates, they can maintain page objects more quickly. Therefore, if E2E testing is something you’re planning to do, UTAM would be a good option.
What about Jest?
If you’ve created LWC components, you’ll be familiar with Jest tests. It’s the default testing framework when creating a new SFDX project and it is the go-to framework that Salesforce advertises when unit testing LWC components.
Unit testing and E2E testing are different methodologies. Both are used to test your application but from different perspectives.
When Salesforce talks about ‘Jest tests’, they talk about unit testing. The code is tested directly and we assert certain functions, calculations and logic are working as expected. This differs from E2E testing, where this methodology focuses on the rendered output of the components. “Does clicking this UI button result in a toast message to display?”, “Does following this UI journey show the correct components?” – these are some example scenarios E2E testing will help ascertain.
Getting Started A Simple Example
Use the below HTML snippet as an example:
Hello,

The JSON page object representation looks like this:
{
    "root": true,
    "selector": {
        "css": "body"
    },
    "elements": [
        {
            "name": "world",
            "selector": {
                "css": ".world"
            },
            "public": true
        }
    ]
}
If you’ve installed and set up UTAM correctly (installation guide), you should be able to run this CLI command:
utam -c utam.config.js
This will build, compile and spit out your javascript page object and the result will look something like this:
import { By as _By, createUtamMixinCtor as _createUtamMixinCtor, UtamBaseRootPageObject as _UtamBaseRootPageObject } from '@utam/core';

async function _utam_get_world(driver, root) {
    let _element = root;
    const _locator = _By.css(".world");
    return _element.findElement(_locator);
}

export default class UnknownPageObjectName extends _UtamBaseRootPageObject {
    constructor(driver, element, locator = _By.css("body")) {
        super(driver, element, locator);
    }

    async __getRoot() {
        const driver = this.driver;
        const root = await this.getRootElement();
        const BaseUtamElement = _createUtamMixinCtor();
        return new BaseUtamElement(driver, root);
    }

    async getWorld() {
        const driver = this.driver;
        const root = await this.getRootElement();
        const BaseUtamElement = _createUtamMixinCtor();
        let element = await _utam_get_world(driver, root);
        element = new BaseUtamElement(driver, element);
        return element;
    }
}
You can then use this page object in your test and write the below test to assert the value within the span tags:
// Import a root page object
import HelloWorld from 'project-directory/helloWorld';

assertEmojis(async () => {
    // Load the page object
    const helloWorld = await utam.load(HelloWorld);

    // Call a UTAM-generated method to get an element.
    const worldIcon = await helloWorldRoot.getWorld();

    const emoji = await worldIcon.getText();
    assert.strictEqual(emoji, '     ');
});
To run the test, in the terminal type in the below. This initialises the Webdriver IO package and runs tests with a defined name.
wdio
The power of POM and UTAM gives you flexibility if the DOM tree changes. For example, if an extra HTML element is introduced making the <span> tag 1 level deeper, you would only need to update the JSON UTAM file to reflect this extra child element; leaving the actual test the same.
An LWC Example
We’ve seen how to test standard HTML files, let’s take a look at an LWC component.
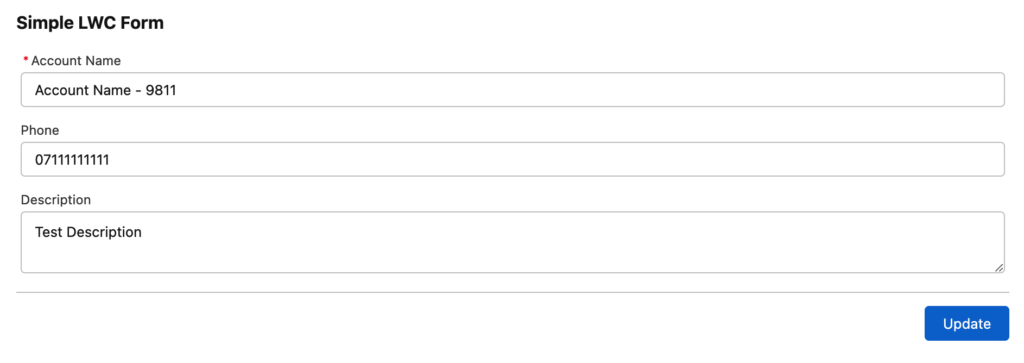
Below is a basic form that uses lightning-record-edit-form and displays 3 standard fields from the Account object.

The JSON page object representation looks like this:
{
    "shadow": {
        "elements": [
            {
                "public": true,
                "name": "recordEditForm",
                "type": "utam-sfdx/pageObjects/recordEditForm",
                "selector": {
                    "css": "lightning-record-edit-form"
                }
            }
        ]
    },
    "description": {
        "author": "nebula",
        "text": ["Page Object: simpleForm"]
    }
}
{
    "shadow": {
        "elements": [
            {
                "public": true,
                "name": "recordEditFormEdit",
                "selector": {
                    "css": "lightning-record-edit-form-edit"
                },
                "elements": [
                    {
                        "public": true,
                        "name": "accountName",
                        "type": "salesforce-pageobjects/lightning/pageObjects/inputField",
                        "selector": {
                            "css": "lightning-input-field:nth-of-type(1)"
                        }
                    },
                    {
                        "public": true,
                        "name": "phone",
                        "type": "salesforce-pageobjects/lightning/pageObjects/inputField",
                        "selector": {
                            "css": "lightning-input-field:nth-of-type(2)"
                        }
                    },
                    {
                        "public": true,
                        "name": "description",
                        "type": "salesforce-pageobjects/lightning/pageObjects/inputField",
                        "selector": {
                            "css": "lightning-input-field:nth-of-type(3)"
                        }
                    },
                    {
                        "public": true,
                        "name": "footer",
                        "selector": {
                            "css": ".slds-card__footer"
                        },
                        "elements" : [
                            {
                                "public": true,
                                "name": "updateButton",
                                "type": "salesforce-pageobjects/lightning/pageObjects/button",
                                "selector": {
                                    "css": "lightning-button"
                                }
                            }
                        ]
                    }
                ]
            }
        ]
    },
    "description": {
        "author": "nebula",
        "text": ["Page Object: recordEditForm"]
    }
}
We’ve added a level of abstraction, where simpleForm.utam.json looks for recordEditForm.utam.json which contain the input fields. This utilises the salesforce-pageobjects library (more on this in the next section).
Once the above page objects are compiled, simpleForm and recordEditForm javascript page objects will be available for you to call in your tests.
// Find the simpleForm component
const component = await activeTab.getComponent2('c_simpleForm');
const simpleForm = await component.getContent(SimpleForm);
const recordEditForm = await simpleForm.getRecordEditForm(RecordEditForm);
const accountName = await recordEditForm.getAccountName();
const accountNameInput = await accountName.getInput();

// Check there is already a value in the input field
expect(await accountNameInput.getValueText()).not.toBeNull();

// Find and set the Account Name and then click on the update button
await accountNameInput.setText(randomAccountName);
await(await recordEditForm.getUpdateButton()).click();

// Check the Account Name value has been updated using the highlights panel
const recordDesktop = await utam.load(RecordHomeTemplateDesktop);
const formattedText = await (await (await (await recordDesktop.getHighlights()).getRecordLayout()).waitForHighlights2()).getPrimaryFieldContent(FormattedText);

expect(await formattedText.getInnerText()).toContain(randomAccountName);
But my components aren’t that simple!
I hear you. To focus on the basics and keep the code snippets small, the examples in this blog are simple on purpose.
UTAM JS Recipes is a great place to start if you wanted to see complex examples. The repository contains tests against standard/custom components and even an example of an E2E test that’s not part of the Salesforce platform. This repository utilises a Node package called “salesforce-pageobjects” – this package is created and maintained by Salesforce and consists of all standard components you may find when interacting with the Salesforce Lightning UI. It’s best to understand which page objects are available to you before writing your own JSON UTAM representation of the DOM tree.
Let’s end-to-end test everything!
Although there are benefits to end-to-end testing outlined in this blog, it may not be wise to create E2E scripts for everything. A few reasons for this include:
- Complexity – some journeys can be long and difficult to test, so ensuring key interactions between them can be time consuming and difficult to manage.
- Cost – although UTAM can help reduce maintenance burden, there is still an element of time and resource involved to write the test and continuously maintain them.
- Control – where a process or journey relies on external systems/services, these E2E tests are prone to failure due to updates outside of our control.
A Helpful Tool
You may find when writing these tests, it’s difficult to know which element in the DOM tree you should use, especially when you’re spoilt for choice using salesforce-pageobjects library.
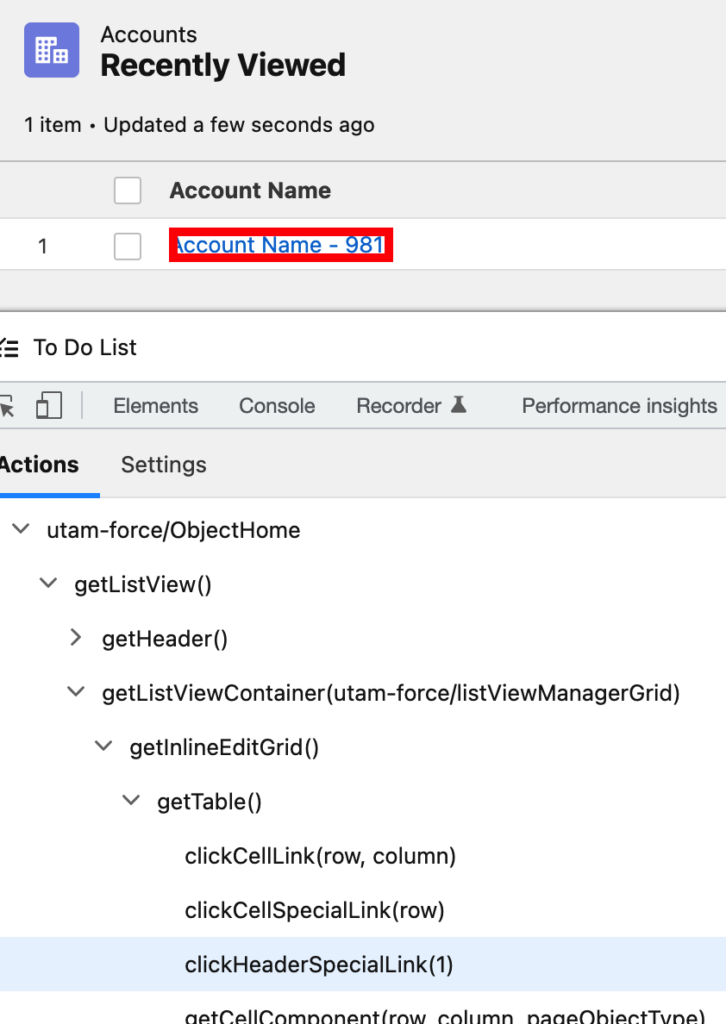
UTAM Chrome extension helps highlight which page object / JS method is available on the page you’re viewing. The highlighting is similar to Chrome’s inspect element tool.

Here is a link to the official documentation on how to set up and use the Chrome extension.
UTAM also provides a generator, which allows you to dump in a HTML file and it will attempt to translate this to a JSON page object. This can be super useful to get a skeleton structure on how your page object should look, however, this generator does not take into account the usage of salesforce-pageobjects library.
For further information on UTAM generator, see the official documentation here.
Be Patient!
From my own experience of using UTAM and any E2E testing – patience is key. There will be a lot of trial and error, however, when you get a successful test run, that automation will provide you with more knowledge/experience for writing your next, more complex, test.


