2018 was the year of GDPR. The new EU regulations came into force on 25 May 2018 and have implications for all personal data that is collected, stored, processed and used by companies. It should be an organisation-wide initiative to ensure you start to be (and remain) GDPR-compliant.
I’m not going to go through what it is or tackle the legalities of the regulations (see the ICO website for more information here) but I can help you to explore the implications from a marketing perspective. If you don’t know where to start then this is a simple guide on to how to manage opt-ins and email preferences in Pardot.
What is opted-in data?
You may well have been doing this already under current DPA law, but opted-in data means that prospects have explicitly chosen to receive your communications and therefore you are allowed to email them. It is also very common to assume that prospects are opted-in until they choose to opt themselves out. This kind of ambiguity is what the GDPR is aiming to remove and therefore it makes it clearer for both companies and prospects as to what opted-in actually means.
However, there is still a grey area with GDPR in relation to having a ‘legitimate interest’ as a legal basis to hold and use a prospect’s data. I would highly recommend seeking legal advice to confirm how your company is interpreting and executing the law.
For now, it is important for you to know how much of your data is currently considered opted-in so you know who you can continue to email post-GDPR. If there is a large proportion of your audience whom you consider to not be opted-in or contactable then now is the time to try and encourage them to opt in so they can remain on your email lists.
Top Tips
- Clarify your meaning of opted-in data across the organisation with your legal team
- Audit your existing data to confirm what opt-in permissions you already hold
- Run a campaign to opt-in those prospects who are not considered opted-in under the GDPR criteria
What opt-in process should you adopt?
Single opt-in
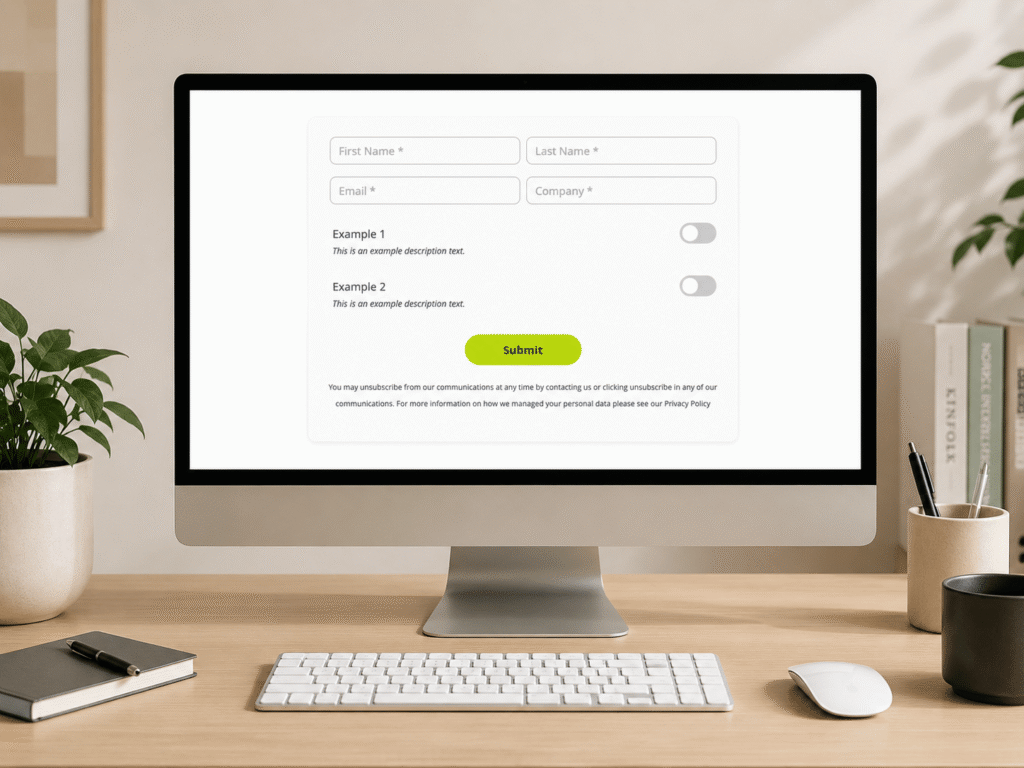
The simplest opt-in to obtain from your prospects is to ask them on submission of a form whether they agree to receive your marketing communications. This statement must be clear, concise and should outline what they are likely to receive from you. This checkbox should not be pre-ticked – it needs to be an explicit and affirmative action from the prospect that they choose to opt-in. It is also good practice to have a link to your Privacy Policy which states how their data is collected, stored, transferred and kept in line with the GDPR rules.

Subscription forms such as ‘Sign up to our Newsletter’ don’t need the opt-in statement as the action of signing up can in itself be considered an affirmative action to opt-in. Although your subscription form should still be clear as to what they should expect to receive and this only opts them in to this specific communication – not all of your emails.
Top Tips
- Know where your data comes from and at what points you need to ask for their opt-in
- Keep your statement simple, clear and for one purpose only
- Consider hiding the opt-in statement if they are already opted-in
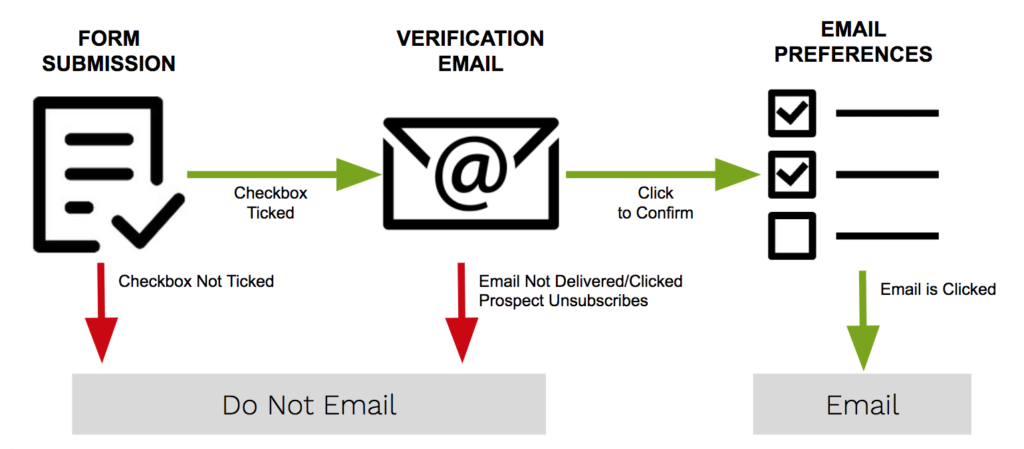
Double opt-in or Confirmed opt-in
Although not a specific requirement of GDPR, Confirmed opt-in (COI) is often adopted by organisations as best practice and for those that have a presence in countries with stricter data protection laws such as Germany and Canada. The same single opt-in is collected on your forms as above, but they must also verify their email address in order to be opted-in to your marketing lists. The purpose is to verify that the email address entered is actually owned by that person – and hence it is definitely that individual that is opting in.
It will also improve the performance of your email marketing as it:
- Helps prevent invalid or dud email addresses from entering your marketing lists
- Reduces hard bounces and maintains clean email database
- Improves response rate and interactivity of marketing emails
Top Tips
- Have fun with your verification email – give it personality and tell your prospects what information they’ll receive when they opt-in
- Send a reminder email to those that haven’t yet confirmed
Managing Email Preferences
Once you have prospects opted-in to receive your communications and you are sending them your emails, you must then give them the option to unsubscribe or manage their preferences. By default, the Unsubscribe link that Pardot provides will globally opt-out prospects from receiving all emails you send. This may not be the intention of the prospect who potentially just wants to stop receiving emails of that type. By providing them with a link to an Email Preference Center, it gives them a choice and enables you to maintain a level of opt-in from your prospects.
An Email Preference Center will list all of the types of emails you regularly send so that prospects can choose to opt themselves in or out of specific lists. This is a chance for you to sell your emails and tell them why they should want to stay opted-in and not miss out on relevant and useful content.
The Email Preference Center will also give them the option to opt out of everything should they want to, but it provides one extra step between globally opting out of everything sent from your Pardot account.
Top Tips
- Don’t over complicate with too many options – we recommend a maximum of 8 options
- Ensure that all your marketing communications are aligned to at least one of the preferences
- Ensure that your ‘opt-in statement’ is suitable for opting prospects into all of your lists
If you need help with any of the above, contact us to discuss your requirements further.