
Once your Salesforce Administrator has set up Salesforce CMS, you’ll be able to create, manage and deliver content across all of your channels in a way that’s super easy to collaborate with your team and even external contacts. Here, we’ll show you how to use Salesforce CMS and some tips around creating and organising your content.
Where to find it
If your Salesforce Admin has set up Salesforce CMS to use with the Pardot Email Builder in Lightning Experience, then you’ll be able to see CMS Channels and CMS Workspaces in the Pardot Lightning App.
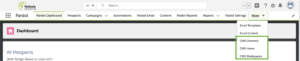
Alternatively, from the App Launcher search for ‘CMS’ to find and open Salesforce CMS.
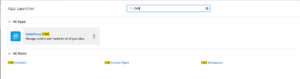
If you cannot find the app, go to Setup > Users > your User profile > and ensure that Salesforce CMS is set to Visible. (If you do not have admin rights in Salesforce, you will need to ask your Salesforce Admin to do this part for you).
CMS Workspaces
You can have multiple CMS Workspaces. Each Workspace has its own folder structure which holds content. For example, you could have a marketing Workspace, and a separate sales Workspace. Workspace contributors can create content and manage access, and all contributors must have a role:
- Admins: can add/remove Users
- Content Managers: have access to everything in the workspace
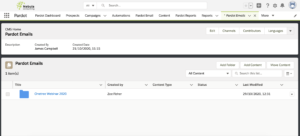
Organise your Workspace
You can add content directly into your Workspace. Best practice is to create folders and store your content in a relevant folder. I’d recommend that your folder structure here is similar to your existing folder structure on Pardot. For example:
- Events
- Webinars
- 2019
- 2020
- 30-11 – OneTree VIP Webinar
- Newsletters
- 2019
- 2020
- Product Updates
Within each folder you can store all relevant images, pdfs and documents so they’re super easy to find for everyone in the team.
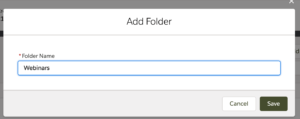 To create a folder, click Add Folder > Enter a name > Click Save.
Creating content
Now you have your folders in place, you can start adding files that you will be using for your email content and website (as well as any other platform you have that requires content!).
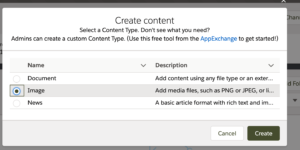
- In your folder, click Add Content
- Select the content type that applies to your file – this example uses the ‘Image’ content type
- Click Create
Now you can choose how to add your content:
- Upload from desktop
- Link to URL
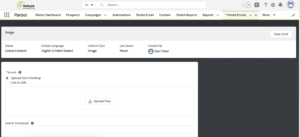
- If you are uploading from desktop, click the Upload File to select a file to upload from your computer or simply drag your file and drop it on the Upload File box. The file will then preview in the box.
- If you are using the link to URL option, paste the externally sourced image url into the box provided. A preview will be displayed.
Once the file has been added, scroll down to complete creating your piece of content.
- Give your content a Title – this will be the name of the content. We recommend using a naming convention to help organise your content.
- Put in some Alt Text – this is what would be displayed in your emails if the recipient did not download your images.
- The content slug will auto-create based on the Title text, this can be edited by clicking the pencil icon.
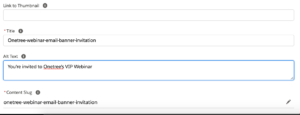
- Once you’re happy with the details of your image, click Save Draft.
The content will be created in Draft form, when you’re ready for this to be made available for use, click Publish.
Managing content
Once you’ve created your content, you can start using it across your marketing channels.
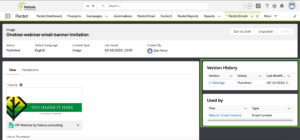
- Version History allows you to manage the various versions of your file and file details, and includes the last modified date.
- You can see where the content is being used in the Used by section.
To update your file, click Edit as Draft. This creates a Draft version of your content, once you have finished updating this, click Publish.
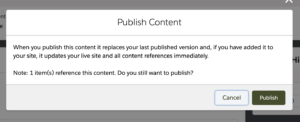
This will replace the last published version and update all references of this content immediately. The latest version will appear in Version History along with the previous versions of your content.
For more learning on how to use Salesforce CMS, check out this Trailhead module. If you’d like assistance with enabling Salesforce CMS, get in touch for one of our experts to guide you through the process!