For companies operating globally, marketing in the native language of your audience may seem like an overwhelmingly complex task. However, there are some steps you can follow using Pardot to make this process easy to manage.
There are three main areas we have considered below to help you get started on your localisation.
- Giving local marketing users access to the right content
- Customising your marketing content in multiple languages
- Tracking your regional websites and domains in Pardot
Giving local marketing users access to the right content
Folder Permissions
Pardot’s Folder Permissions feature is available to all Ultimate edition accounts and those who have purchased Custom Roles. Folder Permissions allows you to assign access to content to different user groups.
If you have multiple regional teams all with their own email templates, landing pages, forms, lists etc., Pardot can quickly become very cluttered for your users. To make the process simpler, each region can have their own content folder which only they have access to. This way, for example, the German marketing team don’t see all the US prospect lists and so on.
To set this up, you’ll need to have all your content arranged into appropriate folders, then follow these steps:
- Create user groups by navigating to Admin > User Management > Groups and add your users to their relevant group. More instructions here.
- In the settings menu for your folders (accessed by the gear icon), you can enable ‘Permissions’ and select the user groups who you would like to have access to that folder. You can find detailed instructions here.
POINTS TO NOTE
- Administrators of Pardot have access to all folders regardless of permissions applied.
- Folder Permissions will not allow you to apply permissions to prospects, because prospects cannot be placed into folders.
Customising your marketing content in multiple languages
Dynamic Content
Advanced dynamic content blocks in Pardot allow you to show different content to each prospect, depending on one of their field values. In this case, to show content in the correct language depending on their Country (or alternatively a custom field for Preferred Language).
To set this up, go to Marketing > Content > Dynamic Content and create a new content block. Add in your translations as variations. If you use a custom ‘Language’ field, then you may use this as the variation field. Do note that if any prospects have a value other than one of your variations or do not have a value in the field you choose, they will see the default content.
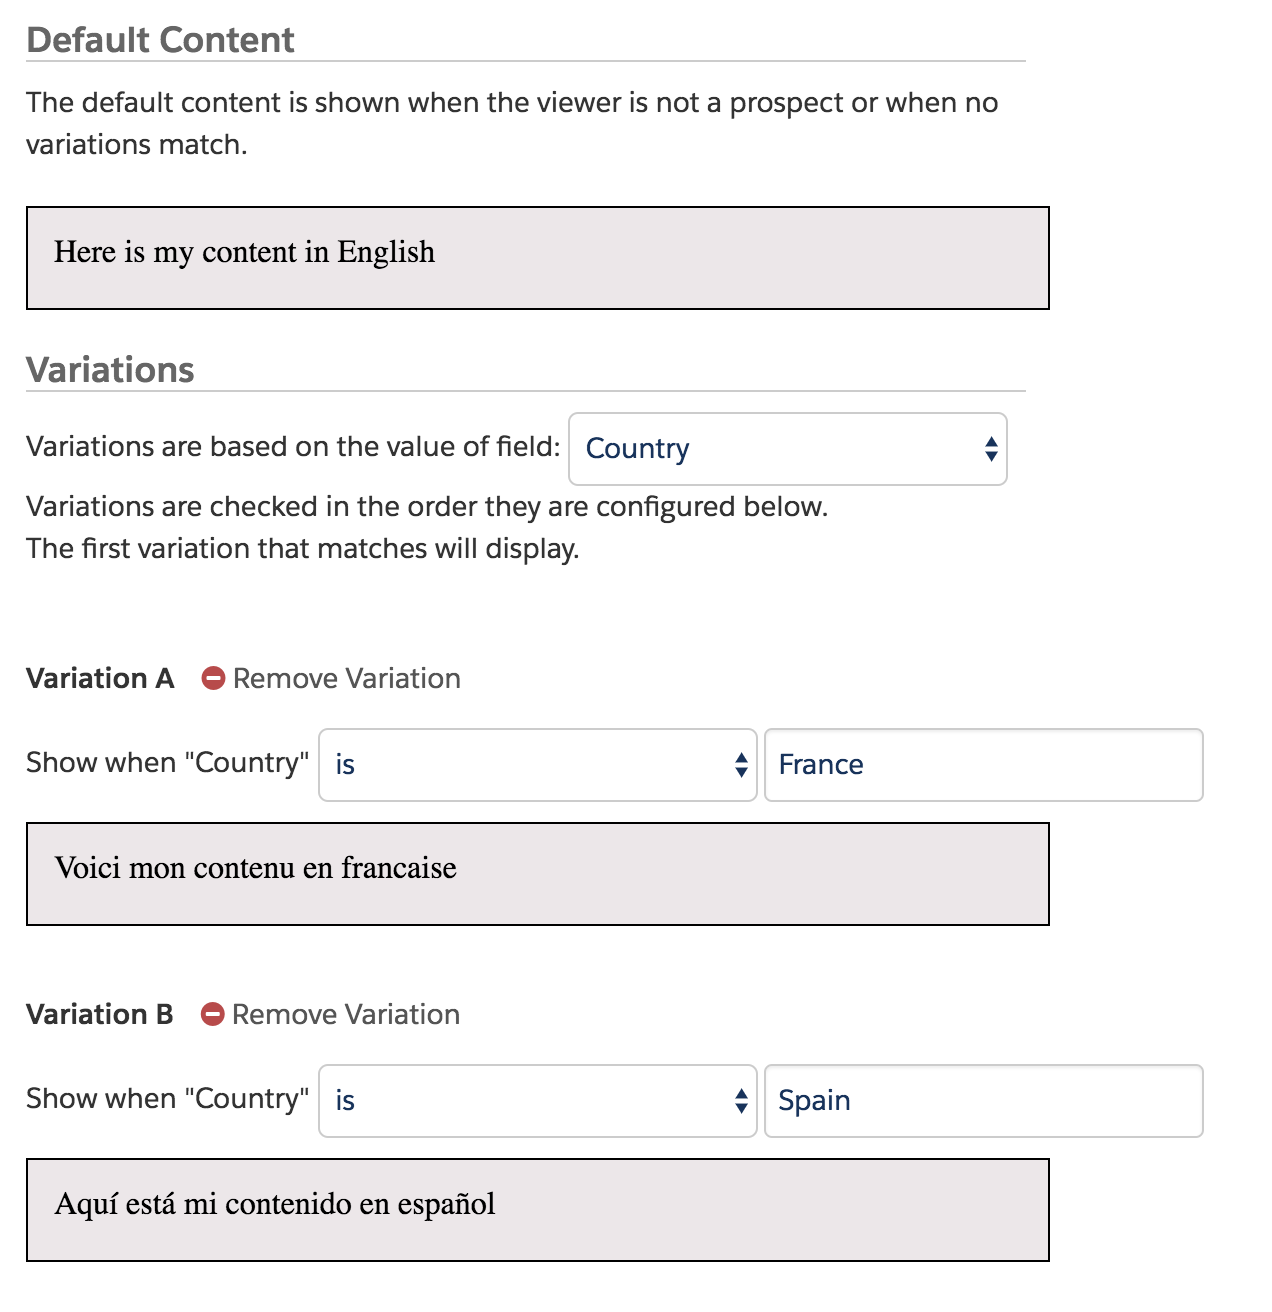
The content in these blocks can be anything from one word to a paragraph of text to a banner. You may need to create multiple sections of dynamic content to ensure every element of your marketing is multilingual.
TOP TIP
Separate multiple values with a semicolon [ ; ] to reduce the number of variations required

POINTS TO NOTE
Advanced Dynamic content is included in Pro and Ultimate editions, and is available as an add-on for Standard edition.
Landing Pages & Web Pages
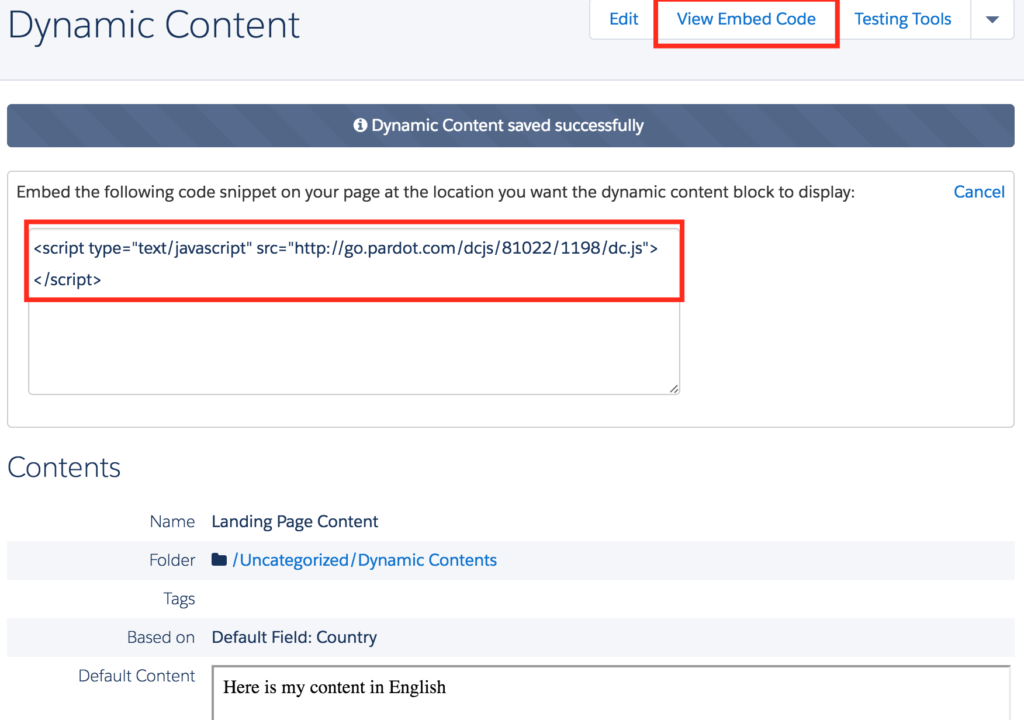
Dynamic Content can be added into both Pardot Landing Pages and pages on your own website, using the ‘Embed Code’. Simply click the ‘View Embed Code’ button in the top-right of the Dynamic Content page. Then copy the code and paste that into your landing page or web page where you would like the content to feature.
TOP TIP
Test your Dynamic Content by using the ‘Testing Tools’ button to see what each version will look like.
To test the content in situ on a page, first ensure your browser cookie is associated with a prospect record in Pardot. Do this by completing a form/landing page or clicking on a tracked email (more on how to do that here). Then you can view the page as a prospect would see it. Update your Country field value in Pardot and refresh the page so you can view the different versions.
POINTS TO NOTE
You may need to ask your web team or a web designer to assist you with adding the Dynamic Content embed code into your website or one of your Pardot Landing Page Layout Templates.
Emails
To add Dynamic Content into an email, you can use the ‘Dynamic Content’ button in the Email Flow editor and select your content from the list.
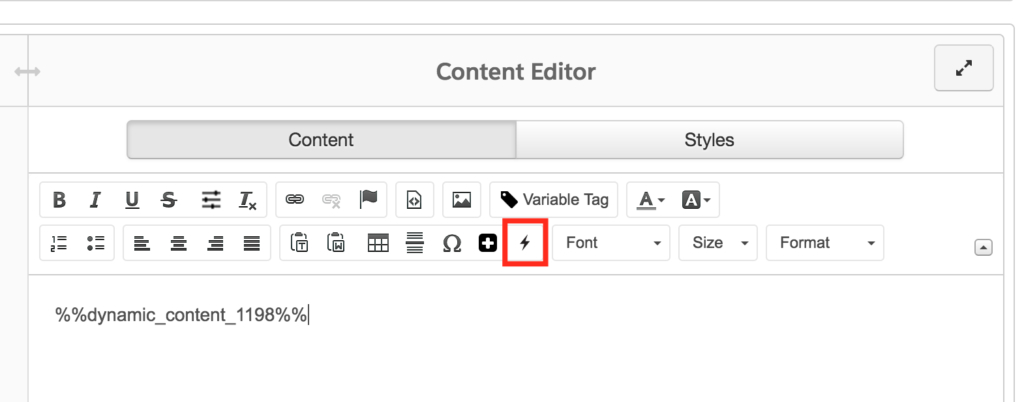
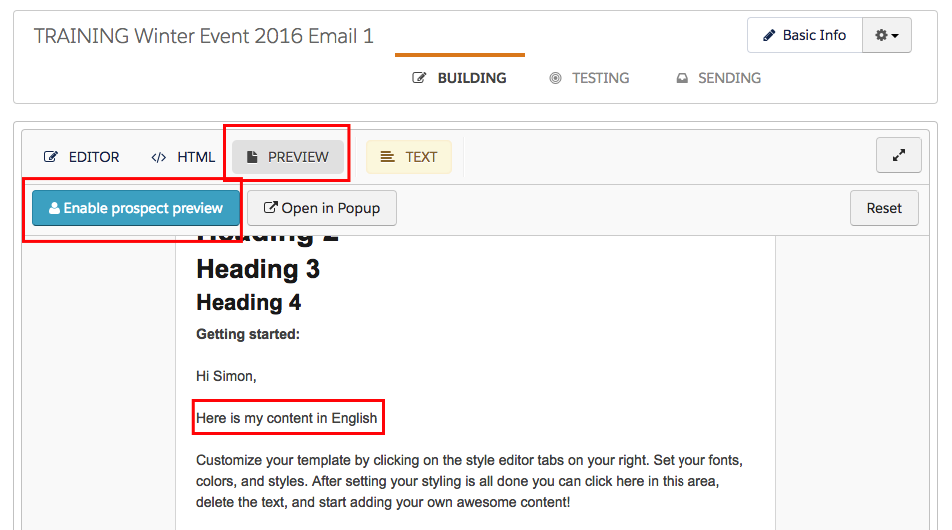
When you view the email in the editor, you see the dynamic content tag and not the content it will be populated with as this will be populated for each prospect at the point of email send. To see a preview of your dynamic content in action, click on the Preview tab and Enable prospect preview:
TOP TIP
To properly test the different variations of your Dynamic Content, send your email to an Internal Test List (more on setting those up here) so that all the content is populated correctly. Update your prospect record with different Country values (or the field you are using to vary content) to view the different variations of content as a prospect would see it.
POINTS TO NOTE
Dynamic Content will not populate when using the ‘Send to Individual Emails’ method of testing your emails. Use an Email Test List to get an accurate view of how your content will display
Forms
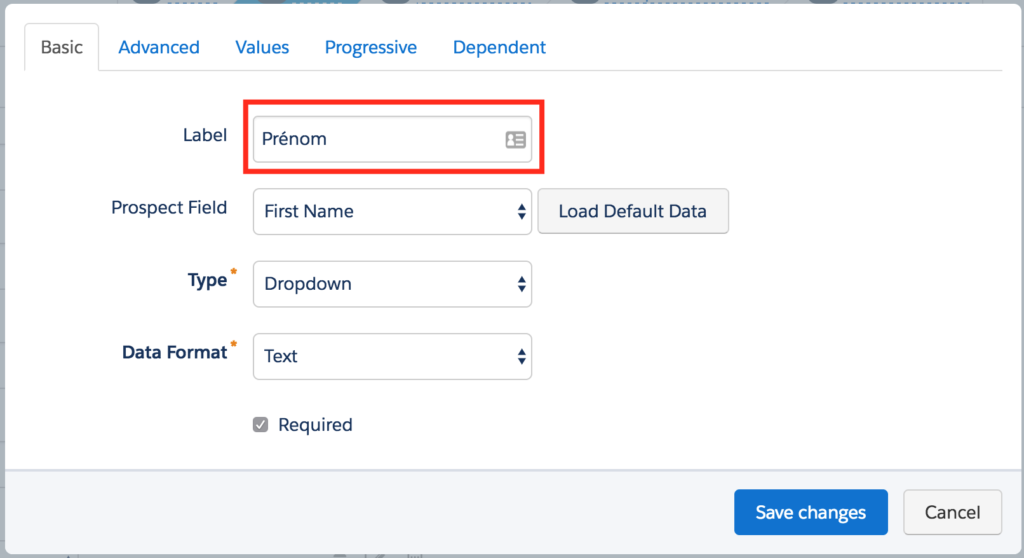
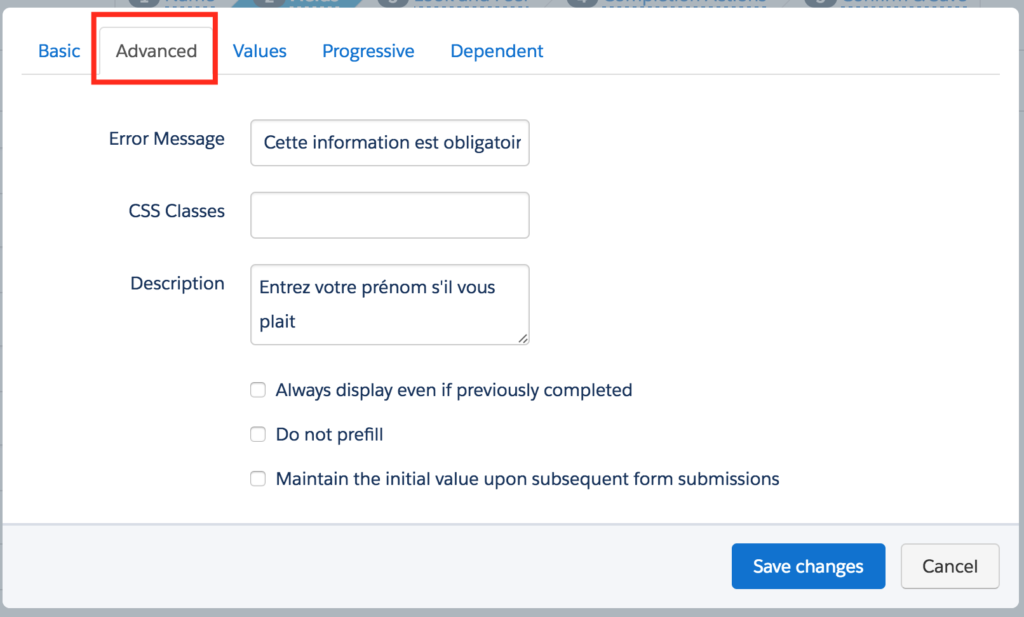
When building forms in Pardot, you can give individual fields different labels, descriptions and values to those which are held in the database. This allows you to display regionalised forms without having multiple versions of each field.
Labels
In the example below, the values will still be saved in the ‘First Name’ field in Pardot, but visitors to this form will see ‘Prénom’:
Description and Error Message
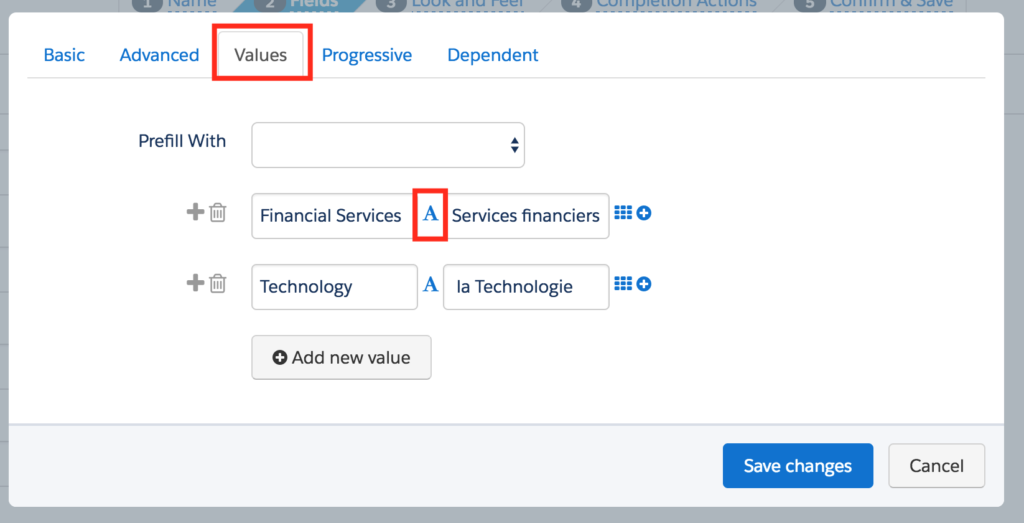
Values (for dropdown, radio button and checkbox fields)
As with labels, you can update what visitors to the form will see without affecting how the data is stored in your database:
POINTS TO NOTE
Where forms are used predominantly for data capture, using Dynamic Content should be avoided as the majority of visitors will not be identified and so will see the default content. Instead, a different form should be created for each language variation with the correct labels, descriptions and values.
TOP TIPS
To avoid increasing your workload with so many forms, try one of the following:
- Use the same form on multiple landing pages – reporting can be done at a landing page level
- Copy an existing form rather than creating one from scratch each time so all the localised content is already populated
Email Preferences Page
The Unsubscribe page and Email Preferences Page can both be customised to accommodate multiple languages using Dynamic Content. The following elements can be updated:
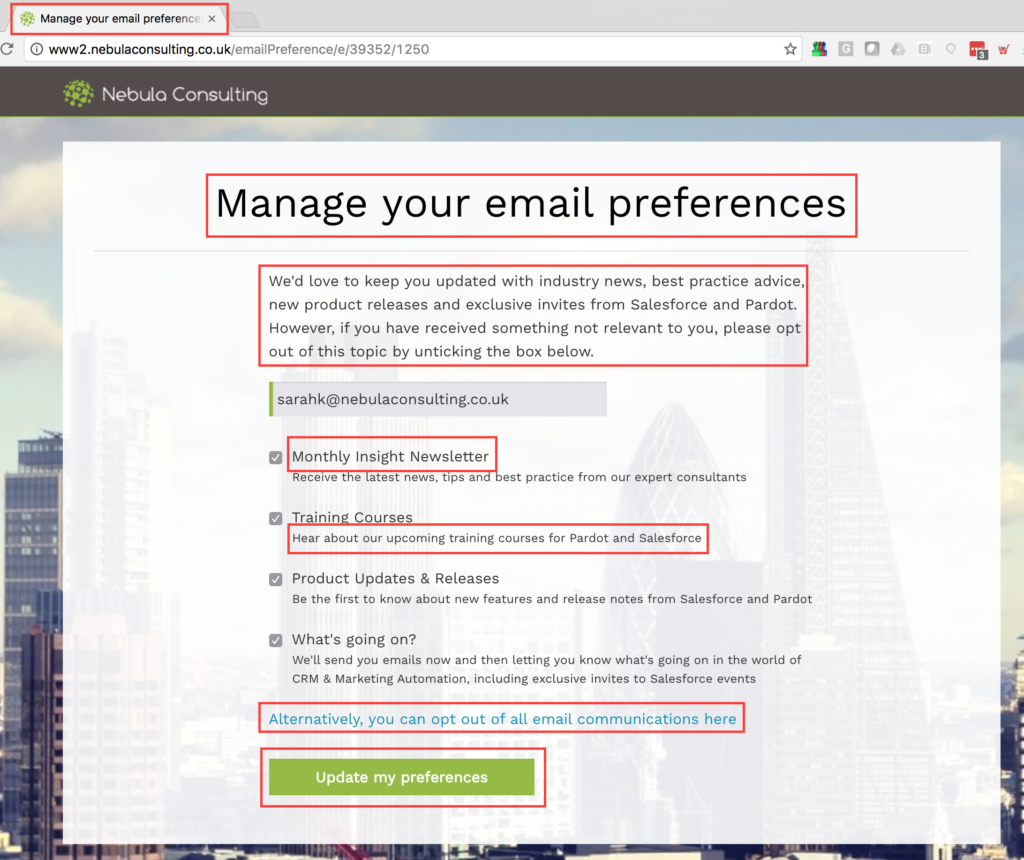
To set up a multilingual Email Preference Center, create a Dynamic Content block for each element. Then, place the embed code in the Email Preference Center setup area (navigate to Marketing > Emails > Preferences Page) or in the Layout Template that your Email Preference Center is using. Please note that this requires a solid knowledge of HTML so you may need help from your web team.
Tracking your regional websites and domains in Pardot
Web Tracking
If you have a site for each of your languages or regions, these can be tracked separately so you can measure and report on the leads and revenue coming in from each of these sites.
To do this, set up a Pardot Campaign for each site and add the unique tracking code for each campaign on to the relevant site. New visitors will then be tracked against the relevant regional campaign.
Email Authentication
If you use different domains or sub-domains for your different regions, each of these domains/sub-domains can be set up so that you can send Pardot emails from them. To do this, simply go to Admin > Overview and in the Email Sending Domains section, add a new domain. Click the Expected DNS entries link and pass this to your domain manager to add the relevant entries.
***
There are many factors to consider when setting up your Pardot account to work across multiple languages. However, once the initial setup is in place you can have a fully tailored and dynamic customer experience for your audience.
If you need assistance with setting up your account to support multiple languages, get in touch with Nebula to see how we can help you.

