If you’re using one Pardot form on multiple pages across your site (for example your website footer), the chances are that you’d like to know what page on your website your prospects have converted on. In this article, we’ll show you how to capture the webpage, with a couple of options for how to achieve this.
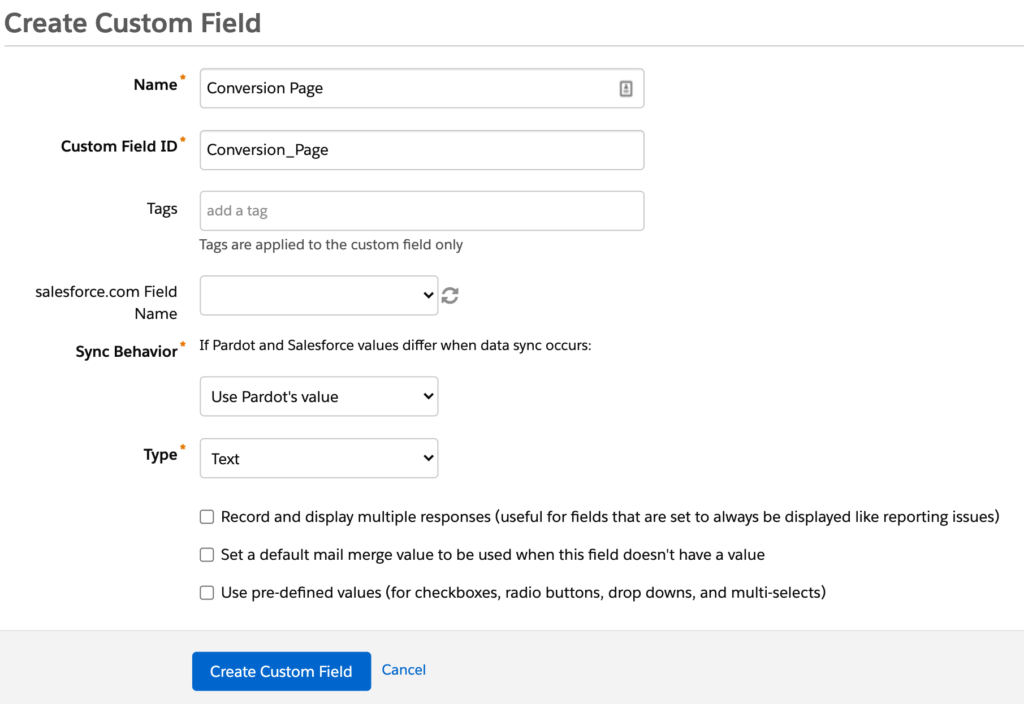
First things first, we’ll need to create a custom field to capture the data in Pardot (if you also want this data available in Salesforce, you’ll need to create the field in Salesforce and map it in Pardot):
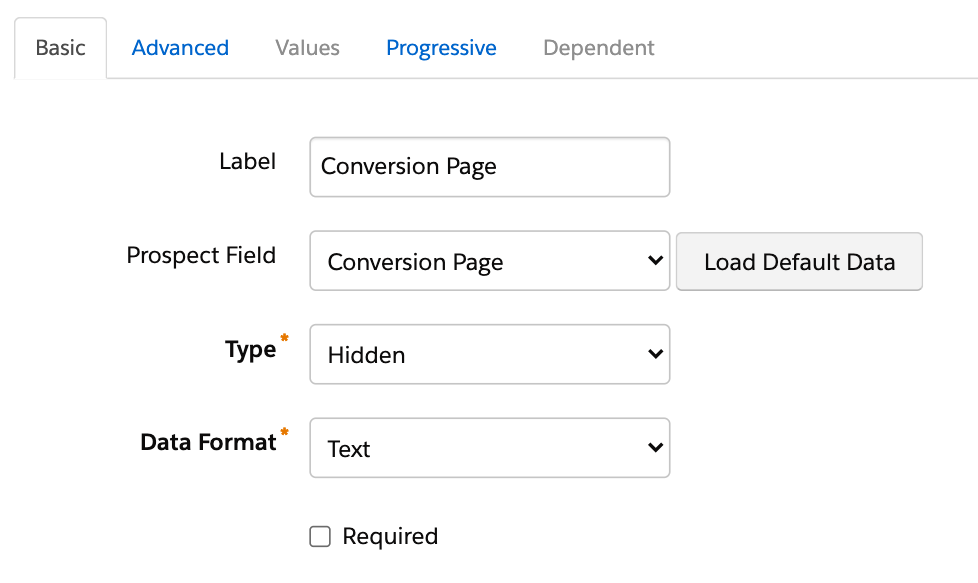
Then we’ll need to add the field as a hidden field on our form:
Then we need to consider how we’re using the forms and choose one of the options below.
Option 1 – The same iframe code is on multiple pages on your website
This option is a low code solution for those instances where you’re inserting the same iframe code on multiple pages on your website – so the same form is appearing on multiple pages.
For this option you need to copy the html code Pardot provides and append the Pardot Form URL with a parameter that exactly matches the name of your custom field ID followed by whatever page the form is on:
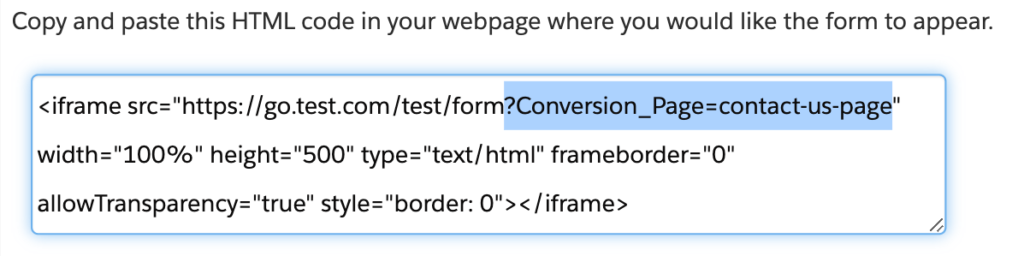
Pardot forms are clever enough to pull in parameters that match field IDs (this is why it’s important for your custom field ID to match exactly!). In the example above the hidden custom field we created and added to the form will be populated with “contact-us-page” once the form is submitted, this will then be stored in Pardot.
Don’t forget that you’ll need to update the value (everything after the ‘=’) on every page your form is used to match the page name.
Option 2 – Your form’s iframe code is automatically inserted on page templates in your CMS
What if you only insert your iframe code into a page template which is then automatically populated on multiple pages? A good example of this would be a contact form in the footer of every page on your website.
This is where we’ll need to get a bit crafty with code. We’re going to use Javascript to capture the page URL (or title), and then re-write the iframe embed code with a customer parameter and the captured data added as a value.
Here’s the code snippet:
First, there are a few key areas we’ll need to update:
PARDOT_FORM_URL
-
- Anywhere you see this in the code above we’ll need to enter our Pardot form URL. We can copy this from the usual embed code Pardot creates:
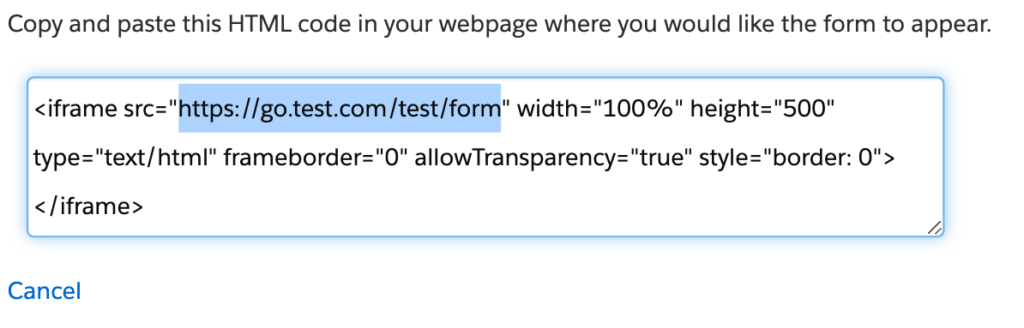
- Anywhere you see this in the code above we’ll need to enter our Pardot form URL. We can copy this from the usual embed code Pardot creates:
CUSTOM_FIELD_ID
-
- Remember the custom field we created in step one? We’ll need to enter the field ID here, exactly as it is in Pardot (yes; capitalisation matters).
Height
- Depending on the size of the form, we may need to adjust the height of the form. To do this we can change the number next to anywhere you see ‘height’ in the code. In the code above we’d need to change ‘1050’.
Let’s break this down
The first <noscript> part is a fallback option to ensure the form still loads even if the user has Javascript disabled. You will just need to update the PARDOT_FORM_URL and height parameters in this section.
The next <script> section is where the magic happens. Without going into each detail, we’re essentially creating the iframe code from scratch. We’re also pulling in the page URL into a custom parameter (which is the name of your custom field ID) that’s then appended to the end of the PARDOT_FORM_URL.
Let’s look at an example. Here’s the code we’d paste wherever we want our form to appear:
So we have a form url of: https://go.test.com/test/form
and a custom field ID of: Conversion_Page
And this is the embed code that will be generated on the page:
So with the above we can see that the form is on the http://test.com/contact page. Pardot forms are smart enough to pull in parameters that match field IDs (this is why it’s important for your custom field ID to match exactly!). So the hidden Conversion_Page field on my form will be populated with http://test.com/contact/ once the form is submitted. This will then be stored in Pardot.
Swapping page URL for page title
In the example above I’m pulling in the full page URL, but what if you’re only interested in the page title? Then you’ll need to make a simple tweak to one of the variables in the code: var title.
If we replace:
var title = encodeURIComponent(document.location);
With:
var title = encodeURIComponent(document.title);
Then we’ll see the page title pulling through instead:
Capturing UTM Parameters
There’s one more thing… This code has been developed to capture any additional parameters from the page URL, such as UTM parameters, and pass them onto the iframe code – that way if you have hidden fields for your UTM parameters these should also automatically populate.
Considerations
Testing
First thing to do when implementing this is to test it. Make sure your form is at the very least pulling through to your webpage, then we can hop in to the developer tools to see if everything is pulling through as expected.
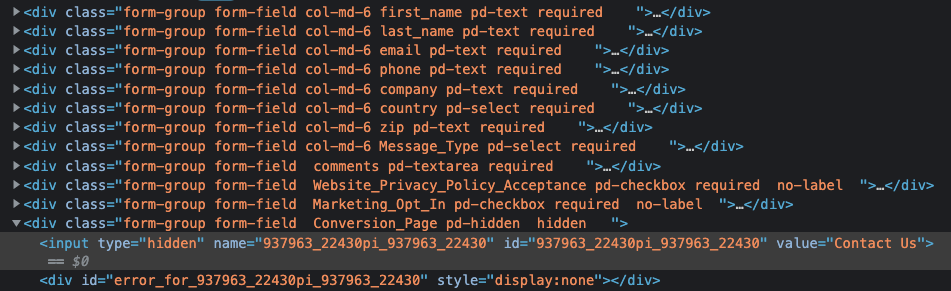
Right click the form > Inspect, then look for the iframe code, if it’s working as expected you should see your Pardot From URL appended with your custom field id and the page URL/title the form is on:
![]()
Next check that the hidden field is being populated with the right value, find your hidden custom field and click the disclosure triangle to see any nested elements, then look for value= It should have been populated with the page URL/Page title value=”contact us”. If not you’ll need to check that your custom field ID is exactly as it is in Pardot.
First touch vs. Last touch
One other thing to consider is if you want to capture the conversion page every time a prospect fills out the form (thus giving you the last page), or if you only wan’t to capture a prospects first conversion page. If you’re only interested in the first conversion page, then you’ll want to check the ‘Maintain the initial value upon subsequent form submissions’ box on the hidden field:

If it’s last touch you want to be tracking then remember to check the boxes to not pre-fill and to always show the field:

You can find Pardot’s help article on this solution here.
If you’d like to learn more about Pardot forms or get some further guidance, then get in touch.