I’ve spent the last few days doing a lot of work with Pardot checkboxes, and thought you lovely people might be interested in finding out more about the behaviour of the Pardot checkbox. Here’s what I’ve learned:
1. Using checkbox fields as variable tags in emails
If you try and use a checkbox field as a variable tag, it will populate the email with the last checkbox value. For example, if you have:
Session 1 / Session 2 / Session 3
as your checkbox values, and you select Session 2 and Session 3, only session 3 will display in a variable tag.
2. Mapping Pardot and Salesforce checkbox fields
Somewhat confusingly, the term ‘checkbox’ means two different things in Salesforce and Pardot.
Salesforce checkboxes are true/false fields and Pardot checkboxes are multi-selects, which can cause some issues if you try to map them together.
You can however, create a basic true/false checkbox that syncs between Salesforce and Pardot. If the prospect does not mark the box, it syncs with Salesforce as false. If the prospect marks the box, it syncs with Salesforce as true.
You can find the step by step of setting this up here.
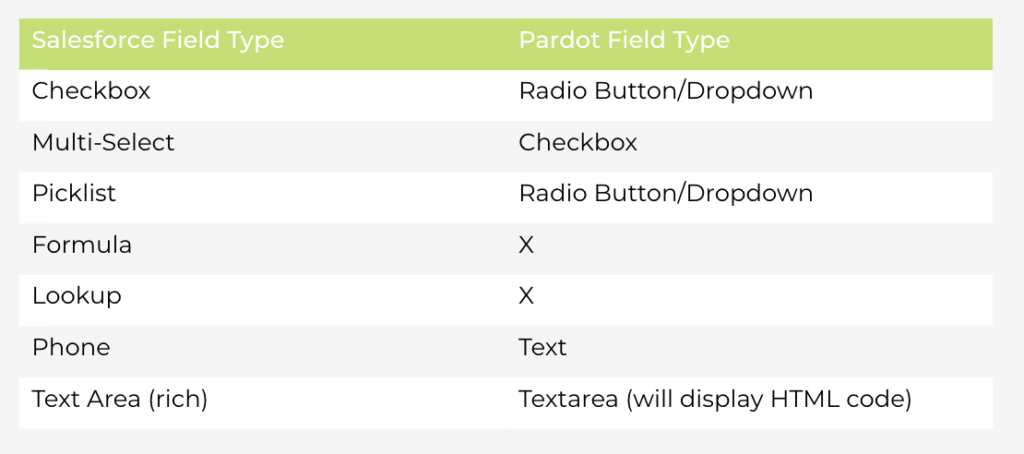
Here is a handy guide for mapping Salesforce field types to Pardot field types:

3. Displaying a checkbox as pre-checked
This is possible, but requires a little bit of javascript code to get it working! If you’re trying to do this, get in touch and I’d be happy to help!

4. Adding prospects to lists based on checkbox selection
You can add prospects to different lists based on which checkboxes they select.
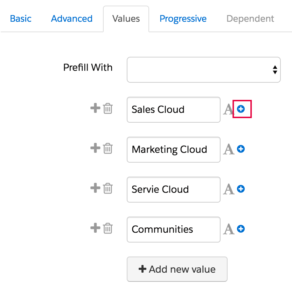
On a Pardot form, make sure you look at the ‘values’ tab within the field settings for the checkbox field.
You will see a little plus symbol next to each field:

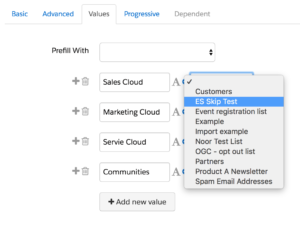
Selecting this field will bring up a drop down list of all available static lists to choose from:
When a prospect selects that option on your form, they will be added to the selected list.
5. Overwriting values
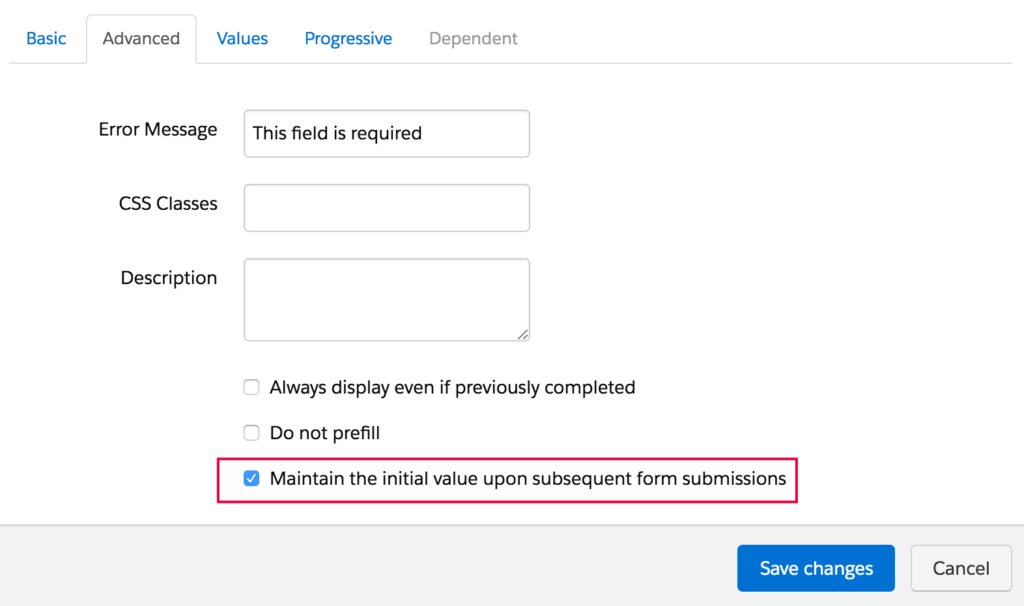
You can have your checkbox field overwritten each time someone uses it – however if you want to avoid this happening, you can go into the field settings of the checkbox field on your form, and look in the ‘advanced’ tab. If you tick ‘Maintain the initial value upon subsequent form submissions’, then your values will not be overwritten. (NB: This setting is available for all other form fields as well).

6. Styling checkboxes on Pardot forms
If you don’t like the way your checkboxes are styled, you can override the default Pardot styling using custom CSS. You can find out how to do this here.
If you run into any checkbox scenarios you need help with, don’t hesitate to get in touch!

