Account Engagement
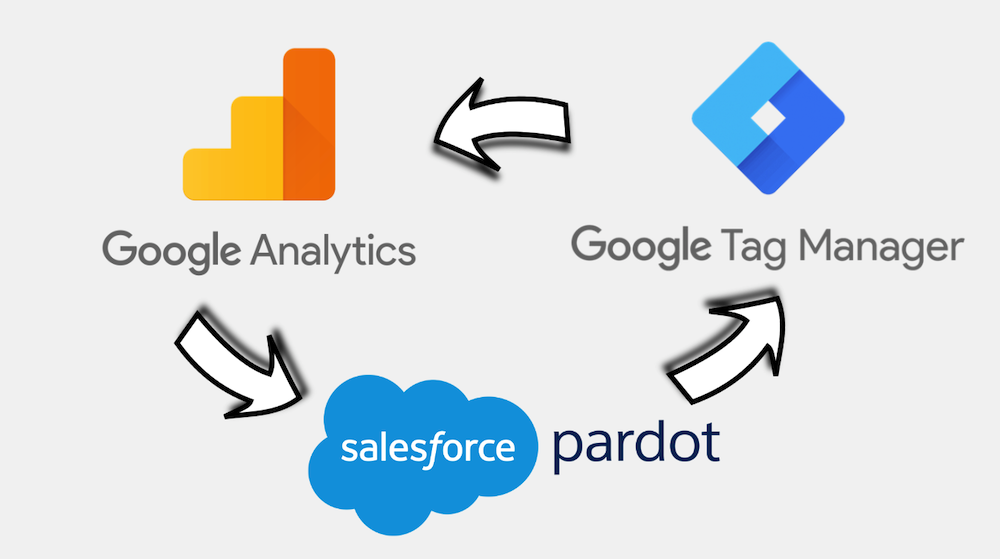
Google Analytics Conversion tracking and Google Tag Manager setup is fast becoming one of our top requests from customers. At first look, it is punishingly complicated with very little help available from either Account Engagement or Google. However, once you break the process down it is actually fairly straightforward.
Follow our step-by-step guide below to get your forms set up:
NOTE: This guide is written for organisations using Google Tag Manager in conjunction with Universal Analytics. If your setup looks different to the screenshots below, get in touch and we can help you get set up.
Add Google Tracking to your Account Engagement Layout Template
In order for Account Engagement to send tracking data to Google Analytics, you need to add your Google Tag Manager container to your Account Engagement Layout Template. If you are already tracking Account Engagement pages in Google Analytics, this container may already be in place and won’t need to be added again.
To add the container:
- Log in to Google Tag Manager and select your account
- Click on your Container ID in the top right – this will be a string of letters and numbers
- Copy the first code and paste it into the <head> section of your Account Engagement Layout Template
- Copy the second code and paste it right after the <body> tag of your Account Engagement Layout Template
- Save your Layout Template
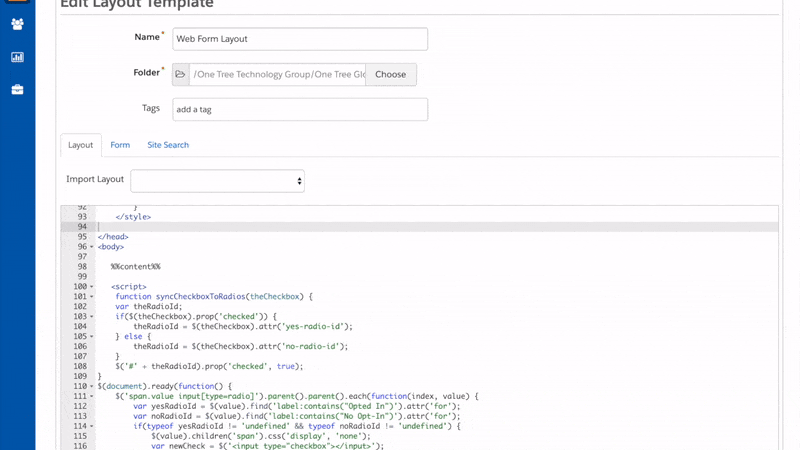
Add an ‘id’ to your Account Engagement Thank You Content
In order to work out how many people have submitted your form in Google Analytics, you need some way of identifying submission. This can be done by sending Prospects to a dedicated ‘Thank You’ page and then reporting on how many people reach that Thank You page URL.
However, if you are using Thank You Content, the URL of the page doesn’t change when the form is submitted. So you need a way of alerting Google Analytics that the form has been submitted. To do this, you will create a virtual (fake) page view triggered by Google Tag Manager. The first step is to add a unique marker into the Account Engagement Form that Google Tag Manager can look out for:
- Navigate to your Account Engagement form and access the ‘Completion Actions’ section
- Access the Source of the Thank You Content
- Add an empty <div> (or any other element) with a unique id(such as id=”thank-you”). For example, <div id=”thank-you”> </div>
- Save your form

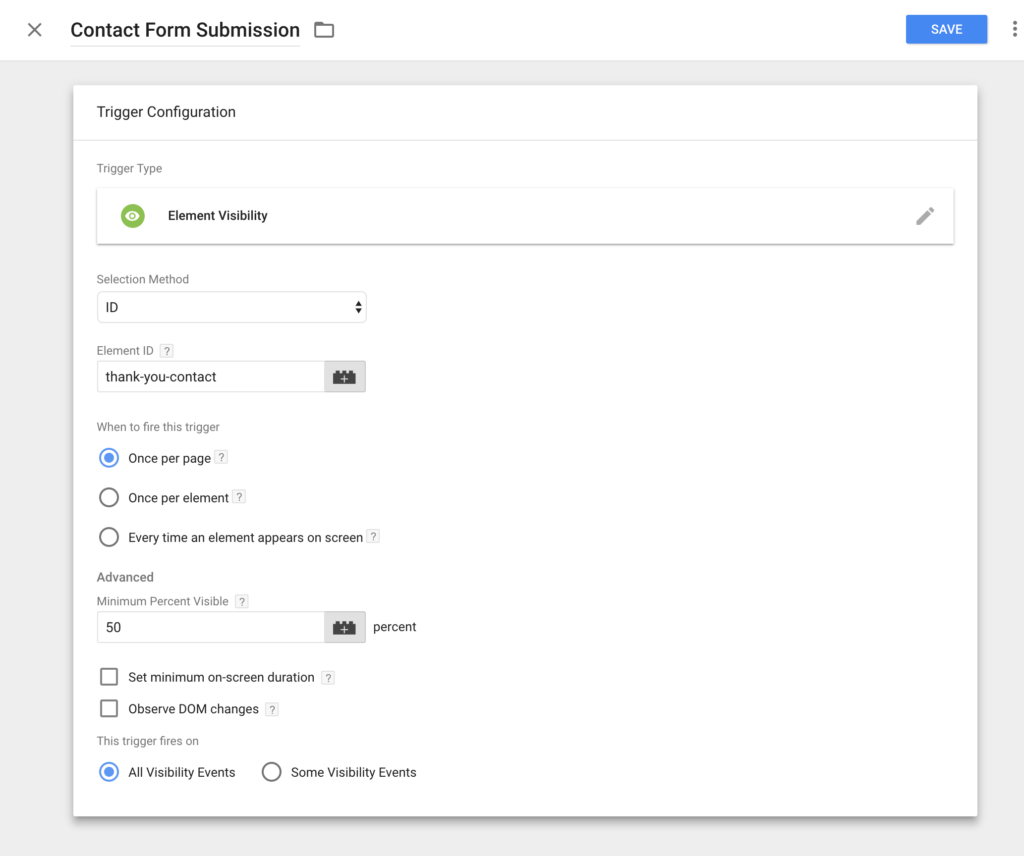
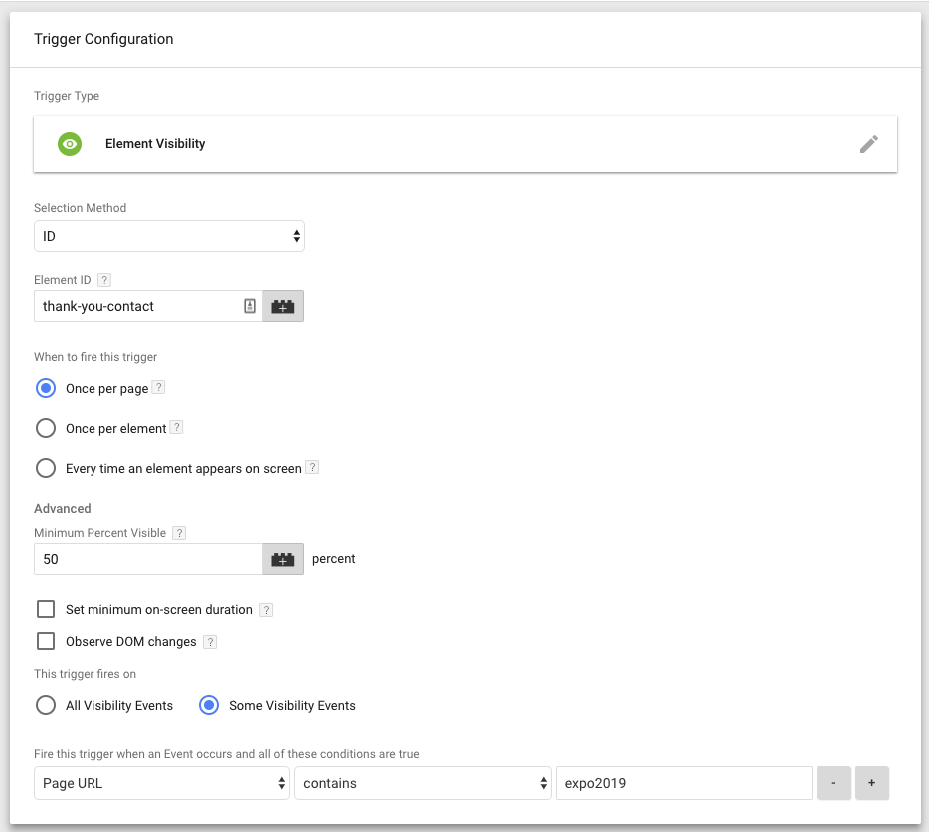
Create a Google Tag Manager trigger
Now that there is a unique flag in your Thank You content, you need to tell Google Tag Manager to look out for this flag, by creating a trigger.
- Navigate to Google Tag Manager and select ‘Triggers’ from the left-hand menu
- Click ‘New’ and select ‘Element Visibility’ under Trigger Type
- Select ‘Selection Method’ as ID and enter the id you used in your Account Engagement Form
- Optionally, change any other settings on the page but for basic set-up, these aren’t required
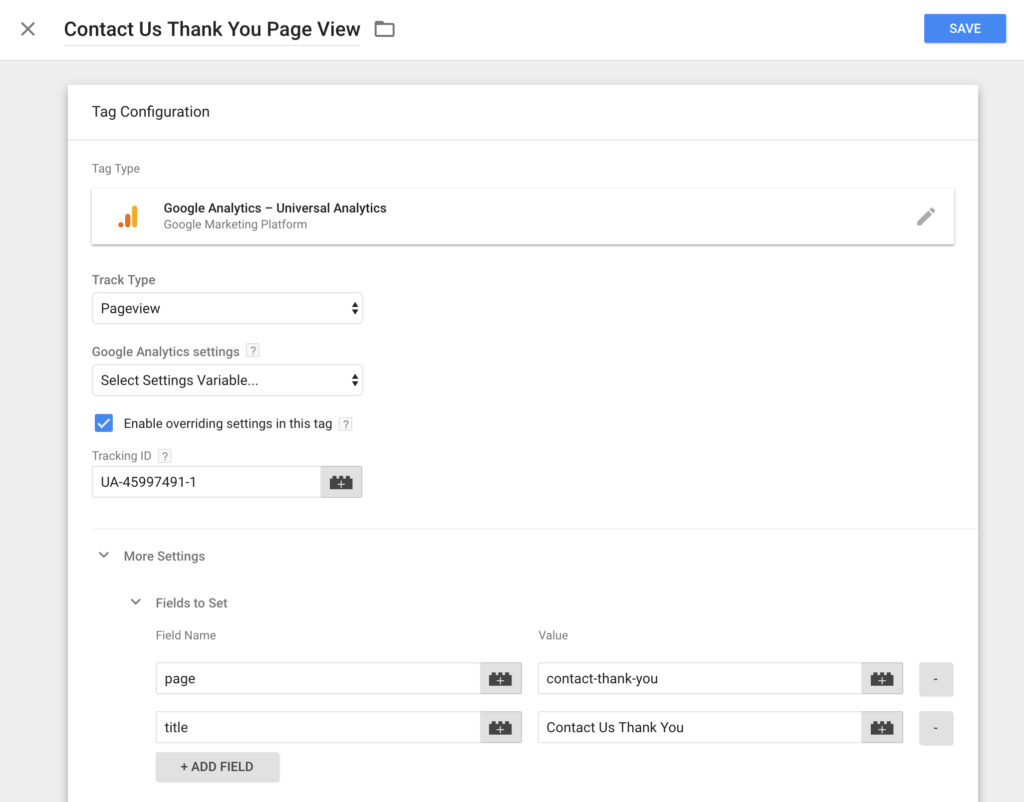
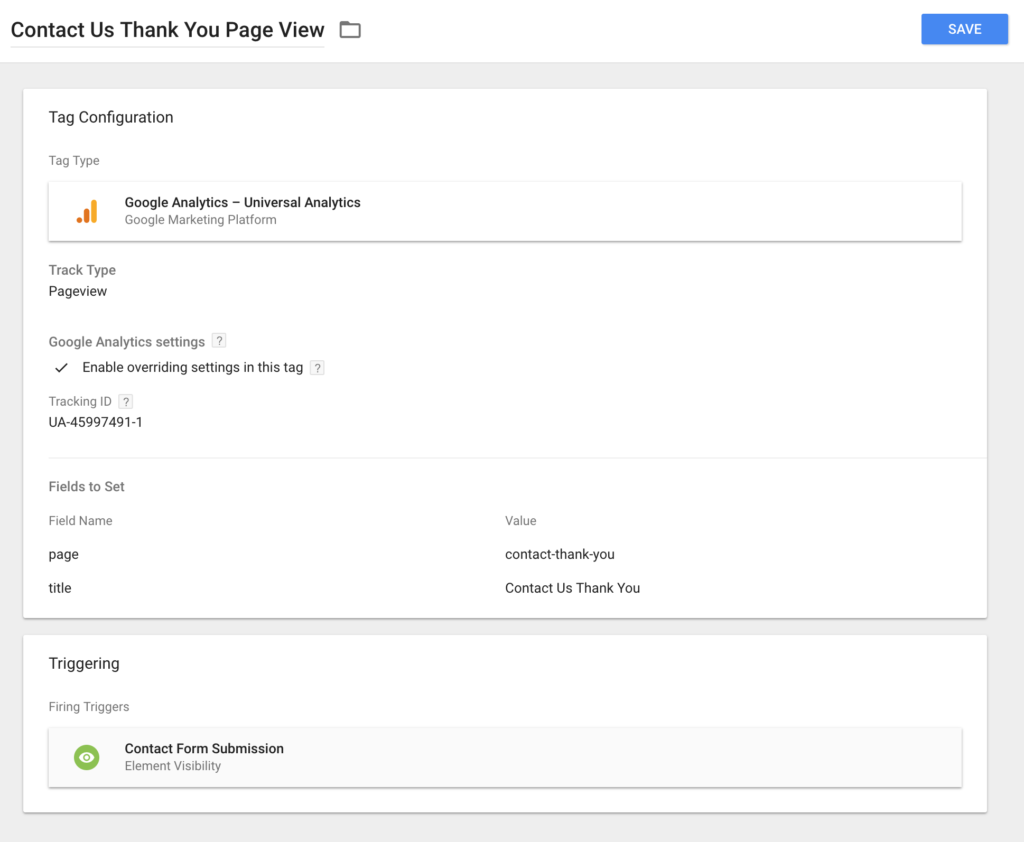
Create Google Tag Manager tag
When the Google Tag Manager tag is fired by seeing the ‘id’ in the Account Engagement Form Thank You Content, it will then need to create a virtual page view in Google Analytics. To do this, you will need to create a new Tag:
- Navigate to Google Tag Manager and select ‘Tags’ from the left-hand menu
- Click ‘New’ and then click into ‘Tag Configuration’
- Select ‘Google Analytics – Universal Analytics’ for the tag type
- Set the ‘Track Type’ as Page View
- Tick ‘Enable overriding settings in this tag’
- Select an existing Google Analytics setting variable if you already have this configured. Alternatively, copy your Google Analytics tracking ID into the ‘Tracking ID’ box. You can find your tracking ID by navigating to Admin > Property Settings in your Google Analytics account.
- Expand more settings and add two ‘Fields to set’
- page – this is what will appear in the URL report in Google Analytics (e.g. ‘contact-thank-you’)
- title – this is what will appear in the Title report in Google Analytics (e.g. Contact Us Thank You)
- Save the Tag Configuration
- Click into the ‘Triggering’ section and select the Trigger that you made earlier
Set up your Goal in Google Analytics
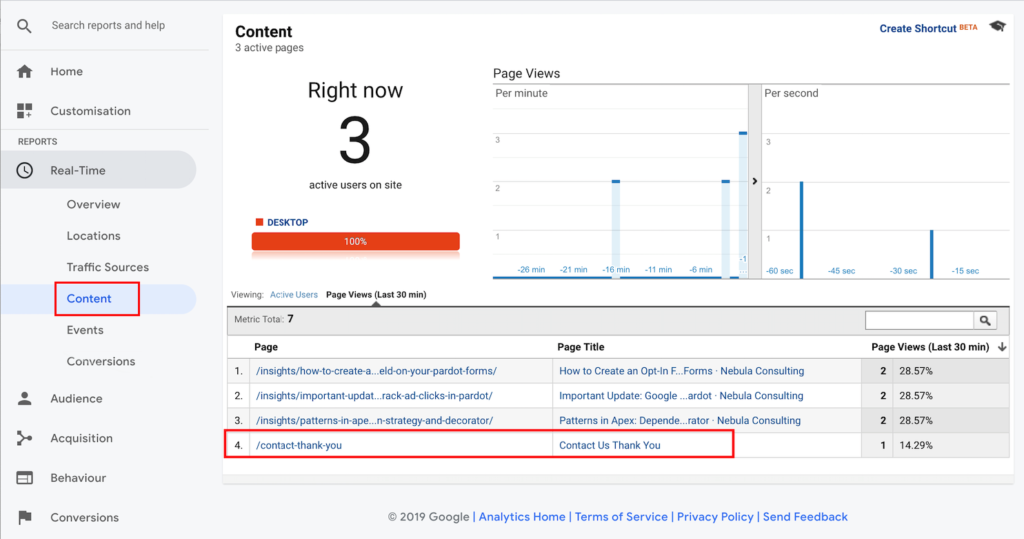
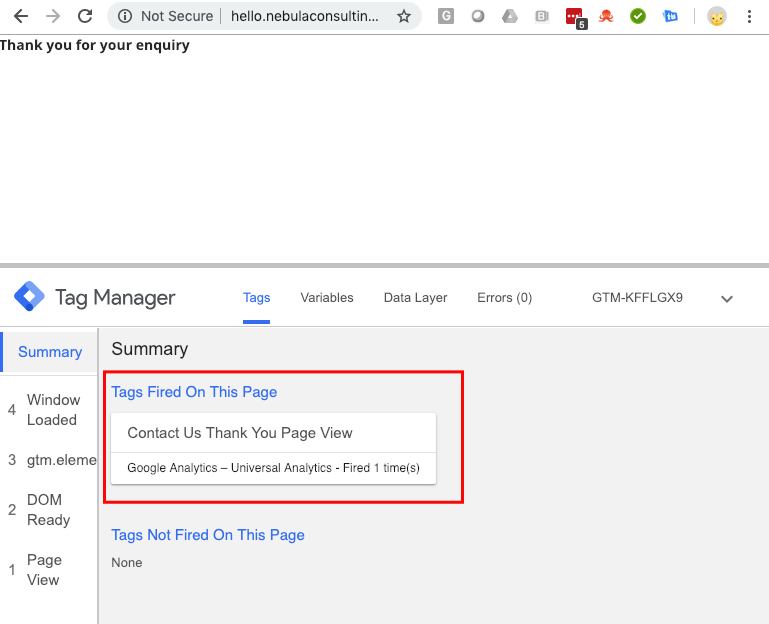
By now, your form submissions should be showing up in Google Analytics as Page Views. Don’t panic if you can’t see them in the standard ‘Content’ report as this has a bit of a lag. Check in the Real-Time section to see your Page Views as they are triggered from Google Tag Manager:
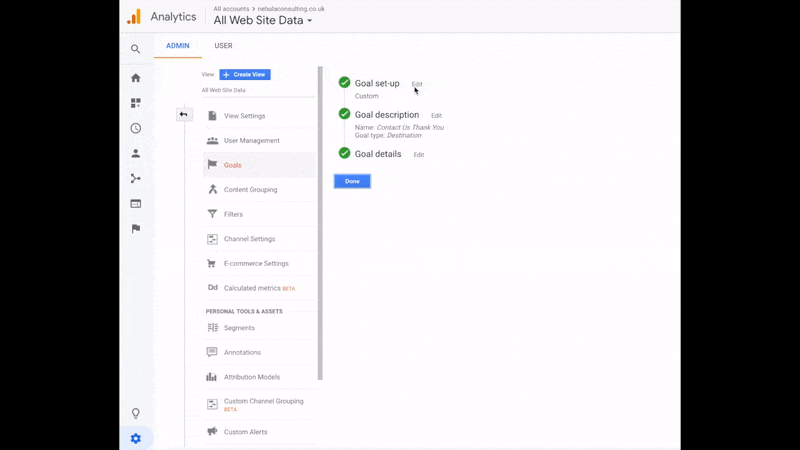
In order to track them as a Conversion, you will need to create a Goal that listens out for your Thank You page views. To do this:
- Navigate to Google Analytics and select Admin, then Goals from the right-hand column
- Click ‘New Goal’
- Under Goal set-up, select ‘Custom’ and click Next
- Give your Goal a name and select the Goal Type as ‘Destination’
- Under Goal details, enter your Destination as the ‘page’ value you set up in the Tag (e.g. ‘contact-thank-you’)
- Save your Goal
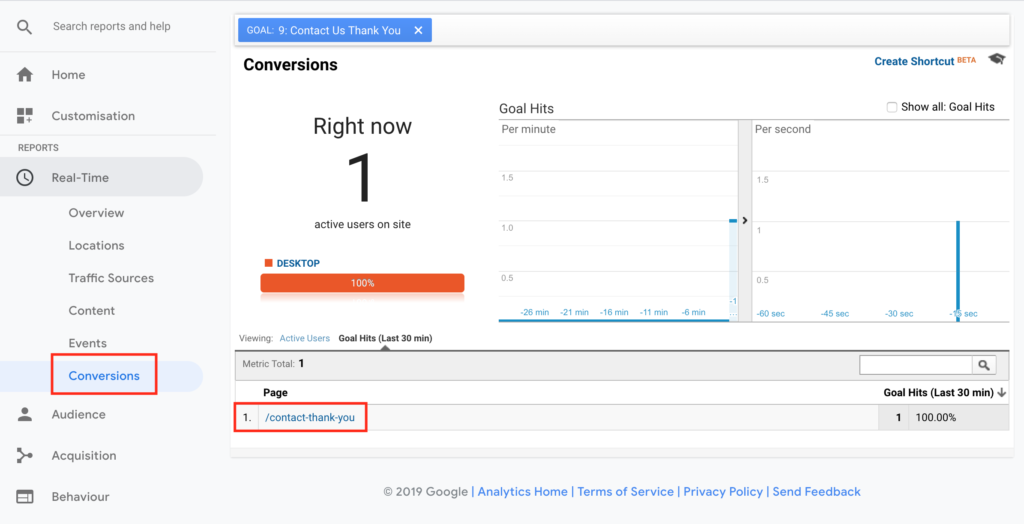
As with Page Views, your Goals report will take 24-48 hours to show any conversions. To see conversions as they come in, go to the Real-Time section and select ‘Conversions’. You should now see your form submissions pop up in real time!
Troubleshooting
If your Goals are not appearing, it can be hard to work out where the process is failing. To help with this, use Google Tag Managers Preview and Debug mode. In Google Tag Manager, click the grey ‘Preview’ button in the top left. When you now load your Account Engagement form, the Debug console will show you which triggers (if any) are being fired by the page.
- If you tags are not firing, the issue is either with the code in your Account Engagement Layout Template or the Trigger in Google Tag Manager.
- If the tags are firing, but you are not seeing the Page Views in Google Analytics, check the Tag in Google Tag Manager is creating the Page View correctly.
- If the Page Views are appearing in Google Analytics, but the Conversion is not there, the issue is with your Goal setup in Google Analytics.
Tracking Multiple Forms
The method described above will track each form you set up individually. However, if you are tracking conversions on multiple Account Engagement forms, you can combine some of these steps to make the process simpler.
To do this, you can add the ‘id’ element which Google Tag Manager is looking for in the Form section of the Layout Template. Then this ‘id’ will be present in every Account Engagement Form using this Layout Template and means that users will not have to remember to add it in the Source section every time a new Form is created.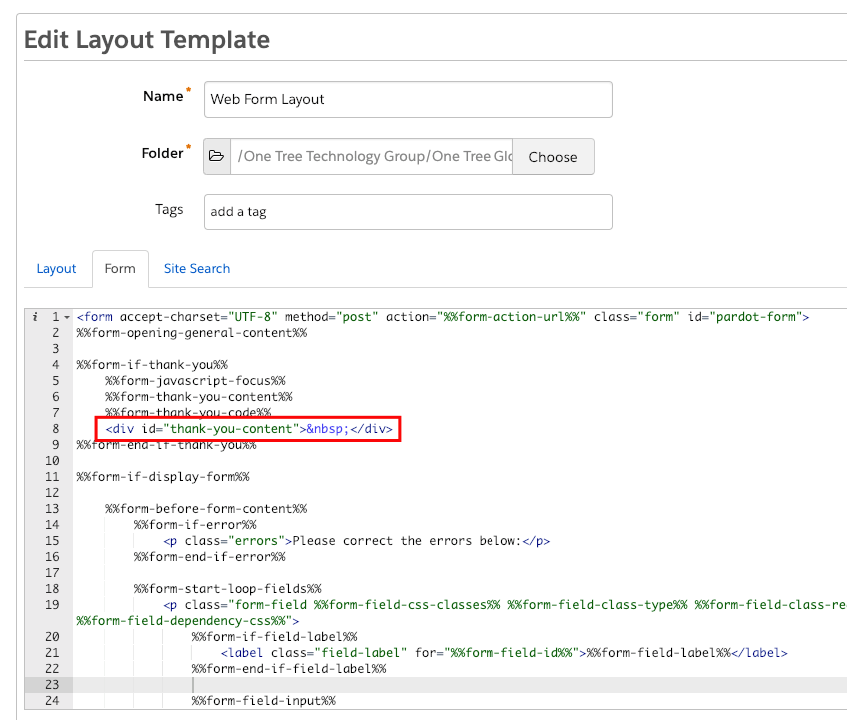
In order to distinguish exactly which Form has been completed in Google Analytics, you can filter the Triggers in Google Tag Manager to only fire when they see the thank you id on pages with a certain URL.
For example, you may have three event forms all using the same Layout Template. All of these will include the generic ‘thank-you’ id in the Thank You Content. In Google Tag Manager, you can create three different triggers that all look for the same id, but only fire when the form is placed on the page URL for that specific event. To do this, select ‘This triggers fires on Some Visibility Events’ in the Trigger setup and then specify the Page URL that the form will be placed on.
***
Hopefully, you are now successfully tracking all your form submissions in Google Analytics and proving the impact of inbound marketing for your business. If you need any help getting started or want to dive deeper into the world of analytics, get in touch with our experts and see how we can help
Note – this article has been updated to reflect Pardot’s name change to Account Engagement.